Skip to content

I Finally Understand My Home Network | Ep2

Steve explains home network basics, setup tips, and answers top viewer questions using real examples and ChatGPT insights.

Ask about this video. Answers come from its transcript only — with the timestamp, so you can check them.

Generated from the transcript and can be wrong — check the timestamp.

Key Takeaways

  • Disabling DHCP on the modem and using a dedicated router improves network management.
  • Switches should be placed after the router and can be daisy chained but not excessively.
  • Wired connections between mesh nodes provide better Wi-Fi performance than wireless links.
  • Identifying devices via MAC addresses and network apps helps manage and secure your network.
  • Organizing and documenting your network setup simplifies troubleshooting and future upgrades.

What the video covers

  • Steve reviews common mistakes made in home network upgrades from his previous video.
  • He uses ChatGPT to analyze viewer comments and selects the top 10 most asked questions to address.
  • The video breaks down a typical home network setup, including modem, router, DHCP settings, and switches.
  • Steve explains why he disables DHCP on the modem and uses an external Wi-Fi router for better control.
  • He discusses the placement of switches after the router and the possibility of daisy chaining switches with limitations.
  • The video covers extending Wi-Fi coverage using ASUS mesh AI technology and recommends wired connections for best performance.
  • Steve demonstrates how to identify devices on the network using apps and MAC addresses.
  • He highlights the benefits of segregating IoT devices on a separate network for security.
  • Cable types and speeds are discussed, emphasizing the use of high-quality Cat 8 cables for future-proofing.
  • Steve stresses the importance of labeling and documenting network cables and devices for easier management.

Answers

Questions about this video

Where should I place a network switch in my home network?

The switch should be placed after your router because the router manages IP address assignments. This setup ensures all devices connected to the switch receive proper network configuration.

Can I daisy chain multiple network switches?

Yes, you can daisy chain switches to connect more devices, but it's recommended not to chain too many to avoid network performance issues.

How can I improve Wi-Fi coverage in areas far from my router?

Using an additional ASUS router with mesh AI technology can wirelessly extend coverage, but for best performance, it's recommended to connect mesh nodes with Ethernet cables.

Full Transcript — Download SRT & Markdown

00:00
Speaker A
Hey everybody, welcome back to video number two of our networking series for this year. I hope you guys liked the first video. It kind of went over some of the mistakes that I have discovered making over the years of upgrading and playing around with my home network.
00:14
Speaker A
playing around with my home network. Now, in today's video, we are actually going to help you better understand your home network. Now, originally, this video was planned out for me to go through and kind of come up with a bunch
00:26
Speaker A
Now, in today's video, we are actually going to help you better understand your home network. Now, originally, this video was planned out for me to go through and kind of come up with a bunch of questions to maybe help you guys out. But what I decided to do is use ChatGPT to go through all of the comments in my old videos, which is over a thousand, come up with the top 10 questions that I got asked the most out of those videos. And this way, it should better help actually answer the questions that you guys are asking.
00:38
Speaker A
got asked the most out of those videos. And this way, it should better help actually answer the questions that you guys are asking. Now, if this networking video series is helpful to you, please subscribe and give it a thumbs up. That
00:48
Speaker A
Now, if this networking video series is helpful to you, please subscribe and give it a thumbs up. That way, it lets me know that you like this stuff. And be sure to subscribe because the third and last video in this series is going to be going over the upgrade plan moving forward. So, if you do have an older network, hopefully that will help you out, too.
00:58
Speaker A
an older network, hopefully that will help you out, too. But with all that said, let's go ahead and jump into question number one. A lot of you may look at my setup and think, "Okay, wow, this is way too complicated. Look at all
01:11
Speaker A
But with all that said, let's go ahead and jump into question number one. A lot of you may look at my setup and think, "Okay, wow, this is way too complicated. Look at all these wires running through the walls and all of this hardware setup." I will say it is a lot easier than you think.
01:18
Speaker A
We're actually going to take a quick look at a setup very similar to this, but I'm going to essentially pull it out of the wall, set it all on a table for us to look at in detail, and hopefully
01:30
Speaker A
We're actually going to take a quick look at a setup very similar to this, but I'm going to essentially pull it out of the wall, set it all on a table for us to look at in detail, and hopefully help explain a little better on what all of this is.
01:41
Speaker A
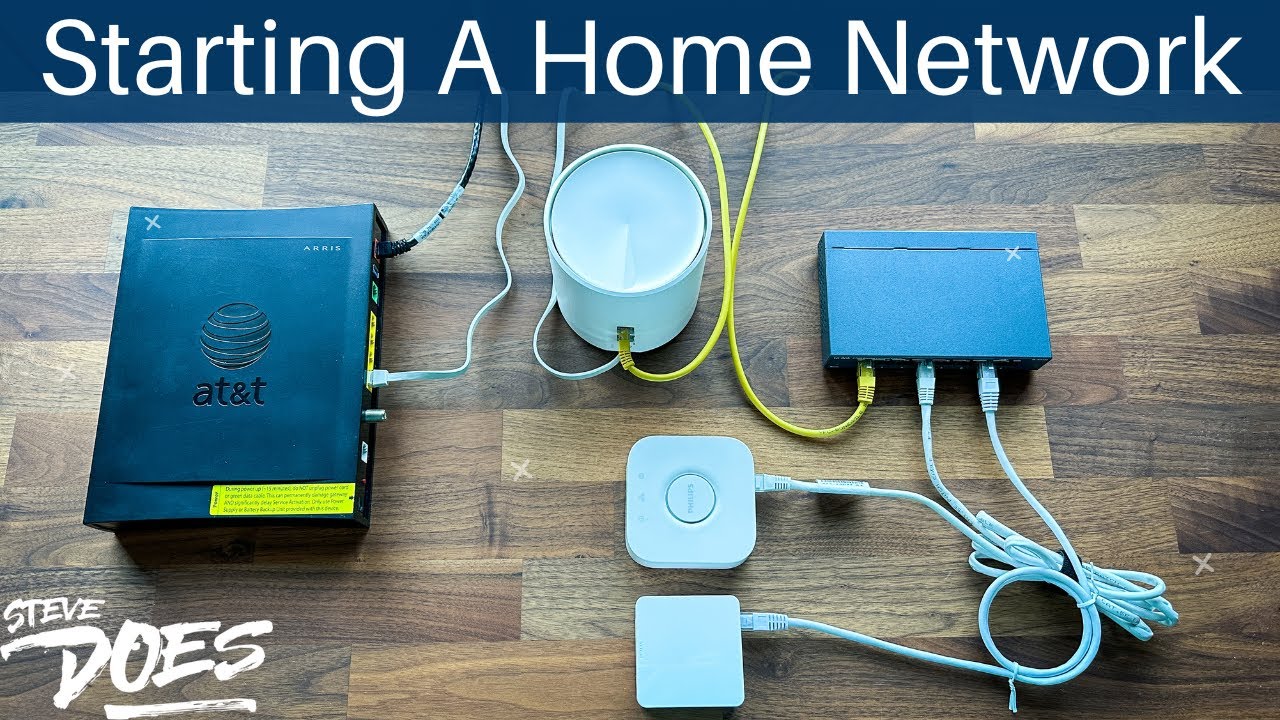
show you what a home network setup looks like when you're planning yours out. So the first thing I have here is I have my internet modem or gateway coming into the house. So my white cable here is my
01:52
Speaker A
Okay, here I have a home network that is essentially consolidated here on the table. We're going to run through this really quick for all of our beginners out there, just to kind of show you what a home network setup looks like when you're planning yours out.
02:01
Speaker A
For me though, I am not going to use the Wi-Fi that is built into here. I am going to add in my own Wi-Fi router. Now I don't have to do this. You can bypass this altogether. Just use this one. But
02:12
Speaker A
So the first thing I have here is I have my internet modem or gateway coming into the house. So my white cable here is my internet coming in. On the back here, I have got different ports right here. So each one of these ports can be used to just plug something hardwired into it.
02:19
Speaker A
I'm also going to turn off the DHCP in here that is going to allow it to pass through. It's going to go into this port right here, and it's going to get plugged into the back of my Wi-Fi. From
02:30
Speaker A
For me though, I am not going to use the Wi-Fi that is built into here. I am going to add in my own Wi-Fi router. Now I don't have to do this. You can bypass this altogether. Just use this one. But for this setup right here, I am going to use this external one. So, inside of my modem, I am going to turn off the Wi-Fi.
02:40
Speaker A
am going to take another Ethernet cable that is going to run into my switch right here. So a big question that we saw in there is where do I place the switch in this line of connections that is going to be after your router?
02:56
Speaker A
I'm also going to turn off the DHCP in here that is going to allow it to pass through. It's going to go into this port right here, and it's going to get plugged into the back of my Wi-Fi. From there, if we look at the back of my Wi-Fi, I'm going to set up whatever Wi-Fi name I want on here. And then I've got all of these ports back here. Now, that's not enough for what I need. So I am going to take another Ethernet cable that is going to run into my switch right here.
03:09
Speaker A
switch plugged in right here. This is a 2.5 gig multi- gigabit switch. And from here, another question that we got asked a lot was, can I daisy chain switches?
03:20
Speaker A
So a big question that we saw in there is where do I place the switch in this line of connections that is going to be after your router? Because your router here is what is handing out your IP addresses for all your devices. This is the brain of your entire network. This needs to come first. Everything then kind of scatters down after that. So, we have got our switch plugged in right here. This is a 2.5 gig multi-gigabit switch. And from here, another question that we got asked a lot was, can I daisy chain switches?
03:30
Speaker A
more devices that I want plugged in. Maybe this is a 100T cable running from one side to the other. I'm going to go ahead run this to the other side of my house. plug these guys here because this
03:39
Speaker A
And the answer is yes, you can. I wouldn't go with too many of those, but you can daisy chain these. So, out of this port, let's say this is on the other side of my house. I have a few more devices that I want plugged in. Maybe this is a 100T cable running from one side to the other. I'm going to go ahead run this to the other side of my house. Plug these guys here because this is where all of my smart home hubs are going to be on this side of the house being plugged into here.
03:52
Speaker A
other side of the house. You're 100 ft away from your router down there and you're just not getting good signal.
03:58
Speaker A
So, that is one scenario for setting up. Obviously, there are a bunch of different scenarios. Now, let's say you're on the other side of the house. You're 100 ft away from your router down there and you're just not getting good signal.
04:13
Speaker A
wirelessly connect to another ASUS router here and essentially boost the signal in this area. Now, what I would recommend if it is possible, instead of using this wirelessly, which is possible, I would recommend wiring these two together. So, wire this one to the
04:30
Speaker A
Another option that we can do is we can add an additional node or satellite or access point, whatever you want to call it, but that can be connected. So ASUS has a feature called mesh AI and essentially allows this device to wirelessly connect to another ASUS router here and essentially boost the signal in this area.
04:42
Speaker A
these devices are on my network? Now, if you've got just a few devices, it's going to be a lot easier. If we take a look at what I've got going on here through my app, it says for device
04:51
Speaker A
Now, what I would recommend if it is possible, instead of using this wirelessly, which is possible, I would recommend wiring these two together. So, wire this one to the back of here. That is going to give you your best signal on this side of the house where all your devices are. So, that way you are going to have the best Wi-Fi coverage possible.
05:03
Speaker A
lot of these are offline because I do a lot of testing. And I want to show you guys kind of how to maybe discover or figure out what some of these devices are. Now, luckily, a lot of these are
05:13
Speaker A
So, question number two is, how do I know what all these devices are on my network? Now, if you've got just a few devices, it's going to be a lot easier. If we take a look at what I've got going on here through my app, it says for device manager, I've got currently 79 devices that are online. If I go ahead and tap on this up in the top left corner, I've got a total of 172 devices. So, this can get very complicated very fast.
05:25
Speaker A
here that I want to go through and kind of give you the rundown of how I would figure this out. So, we're going to go to this one right here in the middle that says LifeEx Plus A19. Now, I know
05:36
Speaker A
Now, a lot of these are offline because I do a lot of testing. And I want to show you guys kind of how to maybe discover or figure out what some of these devices are. Now, luckily, a lot of these are going to be pretty easy. This first one right here, that's just a bunch of numbers and letters. We can see below it that it does say Google and it does say thermostat. So, that is helpful. But I have one specifically pulled out right here that I want to go through and kind of give you the rundown of how I would figure this out.
05:41
Speaker A
And the information it's going to give me is it's going to tell me what satellite it's connected to. So, we're either connecting to my main mesh Wi-Fi router or one of its satellites. Now, it is right next to one of the satellites.
05:53
Speaker A
So, we're going to go to this one right here in the middle that says LifeEx Plus A19. Now, I know that that is a light bulb in my house. I'm going to go ahead and click on that.
06:05
Speaker A
There is the IP address it was assigned. And then below that, we have the MAC address. So the MAC address is unique to every single device. This is going to help us be able to figure out if we're
06:15
Speaker A
And the information it's going to give me is it's going to tell me what satellite it's connected to. So, we're either connecting to my main mesh Wi-Fi router or one of its satellites. Now, it is right next to one of the satellites.
06:20
Speaker A
Now what I want to do is take a look. There's two different ways that we could potentially look at the MAC of this device. First one is going into the app.
06:28
Speaker A
So, I'm glad to see it is actually connected. We can see right here, Orbeez satellite number one. That is the one it is right next to. So, I know it is getting the best signal. It's connected to the 2.4 GHz Wi-Fi. That's perfect.
06:37
Speaker A
We're going to go to lighting settings. And if I scroll down here, we can see down here at the bottom it says serial number. So essentially that serial number right there, it's either going to be called a serial number or a MAC
06:48
Speaker A
There is the IP address it was assigned. And then below that, we have the MAC address. So the MAC address is unique to every single device. This is going to help us be able to figure out if we're looking at the right device or not. So we can see here that is the MAC address.
07:01
Speaker A
it should be printed on the actual device. I'll take a picture here of the actual light bulb and the data on there.
07:06
Speaker A
Now what I want to do is take a look. There's two different ways that we could potentially look at the MAC of this device. First one is going into the app.
07:14
Speaker A
So, if you do have a device that you want to specifically look up to make sure you have the right device and get it named correctly, that is going to be the way to do it. Now, once you have
07:23
Speaker A
So we're in the LifeEx app right here. I'm going to go ahead and tap on this specific light bulb. Up in the top, we're going to click on the three dots.
07:33
Speaker A
room. I like to have the room location first, followed by the brand name, and then followed by what it is. So, for me, I would name this office, LifeEx, light bulb, or smart bulb, depending on how you want to do it. But those are kind of
07:47
Speaker A
We're going to go to lighting settings. And if I scroll down here, we can see down here at the bottom it says serial number. So essentially that serial number right there, it's either going to be called a serial number or a MAC address. And here it's called a serial number. So that address right there, that unique address is going to match up with our MAC address that we're seeing right here. Now, if for some reason you can't see that in the app specifically,
08:00
Speaker A
from there, I would go through my entire list, get everything categorized and set up, and that is going to help me decode this giant mess that I have. All right, question number three is, should a device be wired or on Wi-Fi? Now, the
08:14
Speaker A
it should be printed on the actual device. I'll take a picture here of the actual light bulb and the data on there.
08:26
Speaker A
then just wire it up. So, I'm talking things like TVs, desktop, game consoles, maybe uh network attached storage, your mesh nodes. Wire those up if possible, and then any maybe cameras around the house. Typically, I don't do my cameras
08:40
Speaker A
Now, I can't see this natively myself, it is too small. So, I did take a picture zoomed in. If we take a look at the serial number here, that matches.
08:48
Speaker A
So, we're talking about phones, tablets, laptops, and then also maybe stuff that doesn't take up a lot of bandwidth. So, we're talking about things like smart speakers. So maybe an Amazon Echo device or something that's not pulling a lot of
08:59
Speaker A
So, if you do have a device that you want to specifically look up to make sure you have the right device and get it named correctly, that is going to be th
09:13
Speaker A
splitter. Essentially, it splits up your network into a bunch of different cables coming into it. This is something that is going to be placed after your router.
09:22
Speaker A
Your router is what's going to be creating and passing out IP addresses to all of your devices. And then from your router, you'll go to your splitter, which will bring everything out to all of the devices that you want to get
09:35
Speaker A
wired up. Now, adding on to this with another question that I see quite often is, can you connect two switches together? And the answer is yes, you can. I currently have that set up in my house. We've got the main switch that is
09:47
Speaker A
in the network closet that actually comes through the wall and it goes into a switch here in my office. From there, that switch is connecting to a lot of different smart hubs. It connects to the PC behind me and to the mesh node
10:02
Speaker A
satellite that is also here in the office. Now, you can connect a lot of switches together. One thing to keep in mind if you do this is that with each switch that you connect, you are going to be dropping its latency. So have this
10:15
Speaker A
in mind. If you have got a switch coming in like I have into the office right here. I believe it is an eight port switch. I have eight different things connected to this switch. All of those eight things are now sharing one
10:28
Speaker A
connection. That is the cable that is going back to the other switch. So all of those devices are sharing one data cable going back to the other switch which then has one data cable going back to the router itself. So, just keep in
10:42
Speaker A
mind the more switches you add together, the lower the latency is going to be, which could potentially slow down your connection. Okay, next question is, why is my Wi-Fi bad in one room when I have good internet coming into the house? And
10:56
Speaker A
that is because internet speed and Wi-Fi coverage are not the same thing. You may be paying for fast internet, but you still have bad Wi-Fi. And that can be due to a whole number of things. for example, distance, walls, poor router
11:10
Speaker A
placement, poor mesh node placement, maybe you have interference around your nodes, or a device connecting to a wrong node or satellite. There are a ton of different reasons why you could have bad coverage. For example, some things that
11:24
Speaker A
can interfere with your Wi-Fi coverage are going to be things like a microwave oven, maybe Bluetooth devices, things like baby monitors or security cameras, even something like a USB cable that isn't properly shielded. All of those are going to emit interference that
11:41
Speaker A
could mess up your Wi-Fi coverage. Now, that is just on the electrical side. What about physical objects? So, we've got things like metals that are going to cause a lot of interference. So, we're talking about things like big metal
11:51
Speaker A
objects, reinforced concrete, or even metalbacked mirrors can act like a shield wall for your Wi-Fi. Really hard to get through. In addition to that, we have got things like glass and water.
12:02
Speaker A
Two things that are right in my room right there, which is the fish tank.
12:06
Speaker A
That is going to be huge interference for my Wi-Fi signal. Some other examples are big, thick timber walls. We've got glass tables, even underfloor hot water.
12:15
Speaker A
So, if you have got that hot water system underneath your floor to keep your floors warm during the winter, that is also going to cause interference. So, a few places that I would avoid putting it is don't put it behind your TV. That
12:26
Speaker A
is a giant electrical panel that is going to cause interference. Also, we've got things like a metal cabinet. That thing is just going to block Wi-Fi like crazy. So, avoid that at all costs. So, question number six on here is, how do I
12:39
Speaker A
test my network beyond just running a speed test? And this is a really good question because a lot of people who run a speed test are really just testing their internet speed. You're going to go out there, you're going to find a
12:50
Speaker A
website that'll run a speed test for you or even on your router. There's some options out there for some of the brands where you can run a speed test and that is essentially running an internet speed test. It typically doesn't test your
13:01
Speaker A
internal network. Now, there are a few different ways to do this. and one that was actually brought up in video number one, which caused me a little bit of confusion, but thankfully somebody reminded me what it was, and that is to
13:13
Speaker A
test a devices's signal strength with the router. Now, in my router settings, I cannot go into the router and see what the signal strength is with any of the devices, which is unfortunate. I wish that I could do that. Unfortunately,
13:26
Speaker A
what I have to do is I have to go into each device separately. And not all of them do this, but some of them will show you signal strength. So, I want to show you here on the phone some examples of
13:36
Speaker A
that. All right. So, let's go back into our LifeEx one right here. We saw here we have got Wi-Fi strength. This is just showing us in green dots. Obviously, it's showing that we've got great signal strength right here. It doesn't give us
13:48
Speaker A
an actual number. Other ones will give us an actual number. And I want to bring that up and show you guys. So, if I go into my Ring app, this is one where we can go into the camera. We'll go into
13:58
Speaker A
our settings. We'll go into device health. And then right up here at the top, we've got signal strength and it is rated in dbs or in here it is RSSI.
14:09
Speaker A
So I had to look this up, but I said anything that is in the range of 50 is a good signal. Anything that is 70 and higher is going to be considered a poor signal. So we can see right now signal
14:23
Speaker A
strength for my Ring camera, we're getting a good reading out of it at 52.
14:28
Speaker A
So I am happy with that. All right, next question here is how do I organize my smartome? And I think specifically what is being asked is should I have all of my devices on one main network? Should I
14:39
Speaker A
put my smart home devices on a guest network or if I have the option put it on a separate IoT network? So IoT for you that don't know it means internet of things essentially means your smart home devices. Now, on the setup that I have,
14:53
Speaker A
I do have the option of an IoT network, which is nice because that actually keeps all of those devices on their own network that cannot talk to my main network. So, my main network that I have set up are things like my PC, my network
15:06
Speaker A
attached storage, other personal devices that are around the house. So, laptops, phones like that. I don't want my smart devices to have access to those. So, they are on a separate network that does not have access to the main network.
15:17
Speaker A
However, the main network does have access to the IoT network. This helps keep my personal main devices separated from getting talked to by a smart home device. And that's primarily because some of the smart home devices that I
15:29
Speaker A
have maybe don't get updated often or they're from a brand that maybe had gone out of business or just I don't know, I just don't want them to have access to my personal stuff. So, the number one option is to put all of your smart home
15:42
Speaker A
devices onto the IoT network. Now, I have found that this is not always the case, or at least I can't always do this because how my home network is set up is that anything that is hardwired gets put
15:53
Speaker A
onto my main network. So, all of the smart hubs that I have out there, I'm looking at things from Philips Huegh.
15:58
Speaker A
I'm looking at things like Yui Home Bases that is storing all of my camera footage or even my Lutron shades and light switches. So, all of those are hardwired into my network, meaning that they have access to my main network
16:12
Speaker A
here. But those are all brands that I trust. Those are all brands that are constantly getting updates. They're bigname brands that maybe I have more confidence in than I should. But unfortunately, I don't have the option of plugging these into my network and
16:26
Speaker A
having them be on the IoT network. However, everything else that is connected through Wi-Fi that I want to be on the IoT network is over there.
16:33
Speaker A
Now, if you don't have this option in your router and you do have the option of a guest network, you can put everything over there on your guest network cuz your guest network is kind of the same thing. It keeps everything
16:43
Speaker A
separate from your main network. So, that is one that you can set up. You can name it IoT. You can name your guest network typically whatever you want it to be. So, rename it if you don't want it to use your guest network. Give it a
16:55
Speaker A
general password if you want to do that. Keep all of your IoT devices over there.
16:59
Speaker A
That way your main network can talk to your guest network, but guest network does not have access to your main network. All right, question number eight, and this is one that specifically came from video one of this series, and
17:09
Speaker A
that is, what should I label or what should I document in my home network to keep track of everything. Now, what I would recommend if you really want to get in the nitty-gritty of keeping track of all this stuff and documenting it
17:21
Speaker A
all, open up a spreadsheet. In the spreadsheet, I would label it like this. I would have my device name first. So, what you are calling the device, the room or location of that device, the connection type, so is it hardwired, is
17:34
Speaker A
it connected to the main network of your Wi-Fi, is it connected to IoT or guest?
17:40
Speaker A
And then I would mark down its MAC address. Also, put any notes in there.
17:44
Speaker A
Some of the things that I like to have for notes are any automations that might be connected to it. So, if you have automations and you have named that automation, put that automation name in there so that way you can go back and
17:54
Speaker A
track it if you need to. It doesn't have to be too complicated, but that is a way for you to go back that way. You know, I'm pulling up my app right here. I'm looking through and I see a device that
18:03
Speaker A
has renamed itself, cuz I've had that happen, too. Maybe a device gets a firmware update and it somehow renames itself on my home network. I got to go back in there and change my name. If I bring it up there, maybe the device is
18:13
Speaker A
something I completely don't know. I go in there and I look and I see it's got a MAC address. I go and look in my spreadsheet, find that MAC address, be like, "Oh, this is what it is." I can
18:20
Speaker A
rename it, get everything set back up from there. So, not too complicated, but something that you can do to keep track of your home network. Okay, so question number nine, and this is pertaining to hardwiring your devices up, and it is,
18:32
Speaker A
how do I know if my Ethernet is actually working correctly? Now, this is a great question because even though you might have something hardwired up, doesn't mean that it is working at its peak performance. There could be issues with
18:43
Speaker A
the cable. There could be issues with the switch that you're using, are you getting the right speeds that the switch is saying you're going to get? Are you using an old switch that may be a 100 megbit switch or are you using a brand
18:55
Speaker A
new switch that is a gigabit switch 2.5 gigs or even 10 gigs? Are you getting lightning fast speeds out of there? So, the first thing that you can do is check your switch. Make sure that the switch is fast enough for the speeds that you
19:08
Speaker A
are projecting. I would recommend anybody who has a switch out there at least has a gigabit switch or higher. If you have an old 100meg switch, it's time to replace it. Unless you've using it for a device that does not lean a lot of
19:21
Speaker A
speed, I would recommend replacing it, at least getting a gigabit switch. Those are pretty much the standard out there right now. So, if you buy anything that's halfway new, that's going to work. I'll have links in the description
19:32
Speaker A
below if you guys want to check about any of the stuff that I recommend or stuff that I'm currently using right now. Going through so much testing as I do here on the channel, I've got gigabit switches. I also have 2 and a half
19:42
Speaker A
gigabit switches and then also a 10 gig switch that I really like using. And the 10 gig switch is something that I like to use for like ultra fast networking speed tests because I do have a speed test here on my NAS internally here. So
19:53
Speaker A
I can actually do internal and local speed tests on here which is pretty fun to do but not something that I use a ton. I'll leave links below for all of that kind of stuff too if you guys are
20:01
Speaker A
interested in it. So make sure that you're not on an old switch. I would also check the cables on there. Make sure that there is no fraying or that the shielding on it has not come out of the actual clip that it is on. I've made
20:14
Speaker A
that mistake in the past and I have noticed that it does affect the speed of the network. Also, you can check on the cable itself. Usually, most cables will tell you what kind of cable it is. So, we talking about Cat 5, a Cat 5e, Cat 6,
20:27
Speaker A
7, or 8. The newer cables that I'm buying now are Cat 8 cables, which are lightning fast cables, way more than I need, but they have come down so far in price. I'm fine to just buy that and
20:37
Speaker A
futureproof myself and not have to buy maybe standard Cat 6 cables now and then later down the road need new ones. So, I just buy Cat 8 cables. I know a lot of people say that they're an overkill, but
20:47
Speaker A
you know what? For what I do, I don't care. I'm buying the best out there.
20:50
Speaker A
Okay. So, now the last question out there is, what would I do differently today than what I have done in the past?
20:55
Speaker A
And I would say for beginners out there, I would map your network path. So, going through and having a visual of how your network is laid out. So, we're talking going from your internet modem, attaching to your router, attaching to
21:08
Speaker A
your switch, which may be connecting to other switches, and then what devices are connecting to those. Also going through and tracking what devices are connecting to which of your Wi-Fi networks, which is either going to be your guests, your IoT, or your main
21:24
Speaker A
network. Next thing that I would do is I would go in and make sure that all devices are properly named as they are being added to my home network. So soon as I get something added to it, I'm
21:34
Speaker A
going to go in there. I'm going to properly name it in the naming convention that I like. So that way everything is neat and orderly and I don't have any guessing later down the road. Number two is wiring the important
21:44
Speaker A
stuff. So things that aren't moving, get it wired up. Make sure you're using your switches correctly. So get those switches after your router and then you can daisy chain those together. I just wouldn't go too deep into it. Also, when
21:56
Speaker A
you're connecting your switches together, only connect one cable. Don't try to connect two or three or more cables because that is going to cause a loop back problem. So, one cable connecting both switches together and then from there you can connect all your
22:09
Speaker A
devices to those. Next thing that I would do is I would test my Wi-Fi coverage by room. So, going through each room, a good way that I think that I would do that is we saw with the Ring
22:20
Speaker A
camera. So, the Ring camera has a battery in it and it's giving me a signal strength. I know where it's at right now. It's got a good signal strength. What I can do is I can take that camera and I can walk room to room
22:30
Speaker A
monitoring the strength in each room to make sure that I'm either getting a good strength or average or poor strength.
22:36
Speaker A
And then from there I can go through and take a look at the placements of my mesh nodes, move those around to get better coverage in certain areas. One thing to keep in mind if you are going to do
22:46
Speaker A
something like that is that I believe it does take a minute or two to get an updated signal strength at least for the Ring app. So maybe take your camera, go set it in that room where you want it,
22:57
Speaker A
maybe even the farthest point of that room. Leave it there for maybe 5 minutes or so, and then check the signal strength and see where you're at, and then adjust your Wi-Fi notes accordingly. And then the last thing I
23:06
Speaker A
would do is I would label all my cables and document everything to keep track of it. This helps me keep a more organized network and something that I can always refer back to later. Well, that pretty much covers the most asked questions
23:19
Speaker A
that I've gotten in past networking videos. I hope you were able to get some good information out of this. Now, in the third and last video of this series, we're going to be talking about upgrade paths. So, now that you know how to
23:31
Speaker A
avoid mistakes on building out your home network and going through certain steps to understand your current home network, we need to look at upgrade paths on what to do next. That is what we'll be covering in the next video. Now, if you
23:45
Speaker A
got some good information out of this video, give it a thumbs up. Let me know that you liked it. As always, don't forget to subscribe for more content like this, and I'll see you guys in the next video.
Topics:home networknetwork setupmodem router switchDHCPmesh Wi-FiASUS mesh AIdaisy chain switchesnetwork devicesIoT networkCat 8 cables

Get More with the SozAI App

Transcribe recordings, audio files, and YouTube videos — with AI summaries, speaker detection, and unlimited transcriptions.

Or transcribe another YouTube video here →