The 3 BEST Free Lofi Plugins (2020) | FL Studio Tutorial — Transcript

Discover the 3 best free lo-fi plugins for FL Studio to add warmth, character, and vintage vibes to your beats with this detailed tutorial.

Key Takeaways

  • Ferric TDS enhances warmth and cohesion by subtle saturation and compression.
  • Krush effectively creates a raw, basic sound by downsampling and bit crushing.
  • MDA Degrade offers extreme lo-fi effects with noise generation and vinyl-style warping.
  • Subtlety is key when applying these effects to avoid unnatural or harsh sounds.
  • Free plugins can significantly improve lo-fi beat production without cost.

Summary

  • Introduction to top free lo-fi plugins for creating lo-fi beats in FL Studio.
  • Detailed walkthrough of Ferric TDS, a saturator/limiter plugin that adds warmth and cohesion.
  • Explanation of how to set saturation, dynamics, recovery, limiter, input, and trim dials in Ferric TDS.
  • Overview of Krush by Tritik, a downsampler and bit crusher that reduces polish for a raw lo-fi sound.
  • Guidance on adjusting drive, crush, downsampling rate, and filter settings in Krush.
  • Bonus plugin MDA Degrade introduced for extreme lo-fi effects, especially useful on drums.
  • How to use MDA Degrade’s year and wear dials as bandpass filters and noise generation options.
  • Tips on subtle use of warp depth and shape controls to mimic vinyl warping without overdoing it.
  • Encouragement to share favorite plugins in the comments and free drum download link provided.
  • Call to action to like, subscribe, and tune in for future tutorials.

Full Transcript — Download SRT & Markdown

00:00
Speaker A
Today, I'm going to be showing you guys the top free low-fi plugins that you should be using on all of your low-fi music.
00:08
Speaker A
And I'll also be walking you through how to use them correctly.
00:19
Speaker A
So in this video, I'm going to be sharing with you guys the plugins that I like to use for my low-fi beats.
00:29
Speaker A
If you guys have favorites of your own that you love to share, please feel free to do so in the comment section below.
00:32
Speaker A
So the first plugin that we're going to be looking at today is Ferric TDS.
00:35
Speaker A
This is a saturator/limiter plugin, what this is going to do is help you control the dynamics of your beat.
00:42
Speaker A
As well, it's going to introduce some warmth into it as if it's playing off of tape.
00:45
Speaker A
So this is how the beat sounds with and without the plugin working.
00:57
Speaker A
So what this plugin is doing is it's adding a little bit more cohesion and a little bit more balance to the beat.
01:06
Speaker A
At the same time, it's also adding a little bit of warmth and character as well.
01:10
Speaker A
It's very subtle, but it's very useful at the same time.
01:12
Speaker A
So to use this plugin, what I would recommend doing first is cranking the saturation to a pretty high level.
01:18
Speaker A
This is going to add a little bit of warmth to the beat and a little bit more character.
01:22
Speaker A
So next up is the dynamics dial, what this does is it acts as a compressor.
01:26
Speaker A
So to keep things subtle, what I would do is adjust the dial so the meter dips a tiny bit when the beat's playing.
01:33
Speaker A
If you set the dial way too high, what's going to happen is the beat's going to sound completely squashed and unnatural.
01:39
Speaker A
If you set it too low, it's not going to do very much, and what's going to happen is the different sounds in the beat are going to sound very detached and very separate.
01:46
Speaker A
As for the recovery dial, what this is going to do is help control how fast the compressor is working.
01:53
Speaker A
And I would recommend keeping it to a faster level just so you don't get a lot of pumping in the beat from the compressor.
02:00
Speaker A
Keeping the signal compressed for way too long.
02:02
Speaker A
As for the limiter dial, I kept it to zero because I'm already using a separate limiter later on in the chain.
02:06
Speaker A
So I don't really need this one here.
02:10
Speaker A
And so the only two dials left that are really important are the input and the trim.
02:14
Speaker A
So what the input does is it controls how much of the original sound that's going to be coming through.
02:20
Speaker A
How much of the original dry beat.
02:22
Speaker A
And the trim is going to adjust how much of the effect is going to come through.
02:27
Speaker A
So in order to make the sound a little bit more low-fi, what I'm going to do is reduce the amount of the original signal that's coming through.
02:35
Speaker A
The original beat and have the effect of the plugin be a little bit more exaggerated by turning the trim up a little bit more.
02:40
Speaker A
So again, to do a before and after.
02:50
Speaker A
So as you can hear, it's very subtle, but it does really help bring a warmth and a cohesion to the beat.
02:55
Speaker A
So the next plugin is Krush by Tritik.
02:58
Speaker A
What this is is a downsampler and a bit crusher.
03:00
Speaker A
So to understand what this plugin is doing visually, if you take a look at this picture.
03:06
Speaker A
What we're trying to do is mimic this exact same effect, but with the audio.
03:12
Speaker A
We're basically taking the sounds that we're putting into this effect and making it a little bit more basic and a little bit less detailed.
03:19
Speaker A
So I'll play the beat with this effect on and off once again.
03:30
Speaker A
So as you can hear, this helps the beat sound a little bit more crude and a little bit more basic.
03:36
Speaker A
And reduce how much polish or shine is on the beat.
03:40
Speaker A
And that's exactly the type of characteristic we're looking for if we're trying to make a low-fi beat.
03:45
Speaker A
This is a pretty straightforward plugin, all we really need to do is worry about the top row of effects up here.
03:49
Speaker A
So starting with drive, what this is going to do is saturate or distort the signal.
03:53
Speaker A
So what I'll do is keep this relatively low.
03:55
Speaker A
We don't want to overdo any of these effects, what we want to do is keep it high enough so we can actually hear it.
04:00
Speaker A
But low enough so it doesn't completely change the overall tone of the song.
04:13
Speaker A
So I'd recommend doing the exact same thing with the crush dial.
04:18
Speaker A
What this is going to do is introduce a different type of distortion, a bit depth reduction.
04:23
Speaker A
And so we want to keep it a little bit subtle and keep the setting to a lower amount.
04:36
Speaker A
The downsampling rate, the last dial here, I'll keep this extremely low.
04:40
Speaker A
What this does is it introduces sample rate reduction.
04:45
Speaker A
And this is a very exaggerated effect, so you don't want to overdo this for sure.
04:58
Speaker A
Lastly, what we have is the filter section.
05:03
Speaker A
I would recommend setting this to somewhere around 13 to 16k with a little bit of resonance.
05:10
Speaker A
What this is going to do is help reduce the amount of obvious audio distortion that shows up in the higher frequencies because we are using this plugin.
05:25
Speaker A
And once again, we have the dry and wet meters here.
05:27
Speaker A
What this is going to do is help us control how much of the effect is going to come through.
05:36
Speaker A
The dry controls how much of the original non-affected audio is going to come through.
05:42
Speaker A
As opposed to the wet, which controls how much of the effect is going to come through in the beat.
05:46
Speaker A
So once again, here's how it sounds before and after.
05:56
Speaker A
So as you can hear, with the plugin on, it sounds a lot more basic and a lot less polished when we use this plugin.
06:02
Speaker A
And as a bonus plugin, what we have here is this one called MDA Degrade, this does a similar thing that Krush does.
06:12
Speaker A
But it also takes your signal and turns it to mono for some reason.
06:16
Speaker A
This is something that's actually a little bit better for just drums in my opinion.
06:20
Speaker A
It's a bit too extreme on the master, but for those that want an extremely low-fi type of beat.
06:26
Speaker A
I would recommend maybe using this.
06:36
Speaker A
So to use this effect properly, what we're going to do is start with the year dial down here.
06:40
Speaker A
What this basically does is it acts as a bandpass filter.
06:44
Speaker A
So if we open up an EQ, I'll show you what I mean.
06:54
Speaker A
So as you can see and hear, the lower I set the year, the more pronounced the bandpass filter comes through.
07:00
Speaker A
So what I'd recommend is keeping it to a setting of 1980 or 1970 just to keep this effect a little bit more subtle and not too exaggerated.
07:07
Speaker A
As well, the wear fader here does a very similar type of effect.
07:12
Speaker A
Where it just reduces the overall frequencies that are coming through.
07:15
Speaker A
So now that we've lost a little bit of presence in the beat using the year and the wear functions.
07:23
Speaker A
What we can do is reintroduce some of that presence back into the beat using the noise generation that this plugin has.
07:29
Speaker A
And we can do that using the mechanical noise, electrical noise, dust, or scratch settings.
07:42
Speaker A
So once again, I'd recommend using this subtly.
07:46
Speaker A
What this basically does is going to let us bring back some noise and some presence back into the beat using these types of effects.
07:53
Speaker A
I'd recommend staying away from the scratch effect though, that just makes your beat sound completely horrible.
07:59
Speaker A
I don't know why anyone would want to use that.
08:01
Speaker A
So a lot of people like to use this plugin for the warp depth function here.
08:07
Speaker A
What this does is it sort of introduces a constant modulation of the pitch of the overall beat.
08:14
Speaker A
It basically mimics how a vinyl would sound if it was a little bit warped.
08:18
Speaker A
Down here also, we get to control the shape of the warping.
08:23
Speaker A
So this is something that you want to use a little bit subtly, especially on the master.
08:30
Speaker A
We don't want to overdo this and make it sound like a complete trash.
08:33
Speaker A
This is just a small effect to introduce a little bit of character to the beat.
08:37
Speaker A
And there you have it, there are my favorite low-fi plugins.
08:41
Speaker A
Once again, if you guys have your own that you like to share, please leave them in the comment section below.
08:47
Speaker A
And if you like the drums from this beat, I've included a free download to them in the description box below.
08:52
Speaker A
Please again, like and subscribe, and I'll see you guys next Tuesday.
Topics:lofi pluginsfree pluginsFL Studio tutoriallofi beatsFerric TDSKrush pluginMDA Degradebit crusherdownsamplermusic production

Frequently Asked Questions

What does the Ferric TDS plugin do in lo-fi music production?

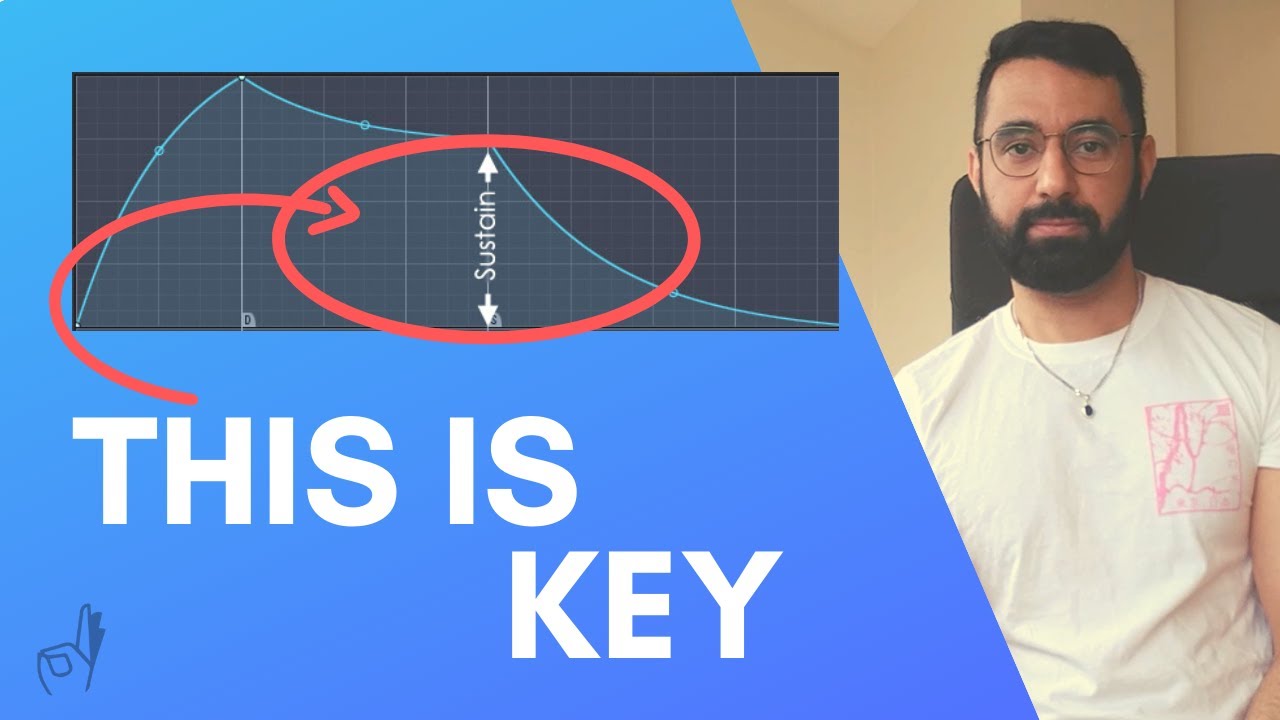
Ferric TDS acts as a saturator and limiter that controls dynamics, adds warmth, and creates cohesion in lo-fi beats by mimicking tape playback.

How should I set the controls on the Krush plugin for a lo-fi effect?

Keep the drive, crush, and downsampling rate low to add subtle distortion and reduce polish, and use the filter section to reduce high-frequency distortion.

Is the MDA Degrade plugin suitable for all parts of a lo-fi beat?

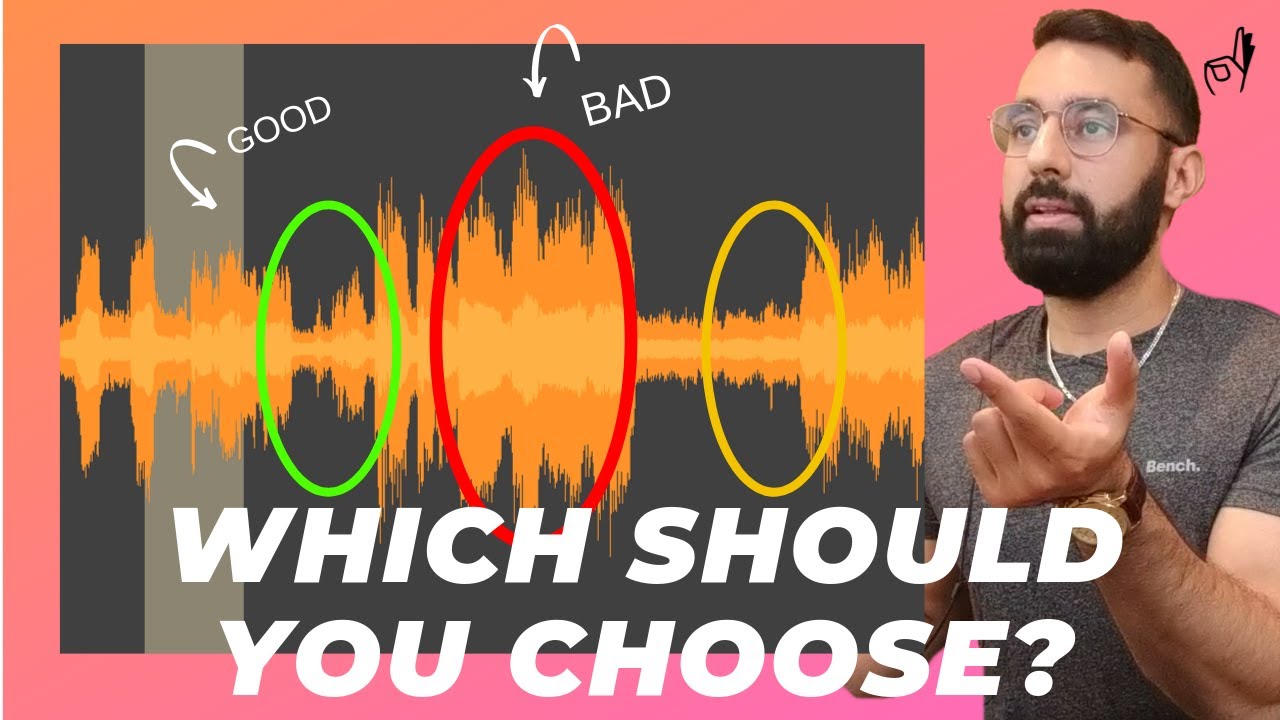
MDA Degrade is better suited for drums or extreme lo-fi effects; it turns signals mono and can be too harsh on the master track if overused.

Get More with the Söz AI App

Transcribe recordings, audio files, and YouTube videos — with AI summaries, speaker detection, and unlimited transcriptions.

Or transcribe another YouTube video here →