Screen recording has become an essential skill in today’s digital landscape, whether you’re creating tutorials for YouTube, documenting software bugs for your development team, or recording important video calls for later review. As remote work and online education continue to expand, the ability to capture both visual content and audio simultaneously has transformed from a nice-to-have feature into a critical productivity tool. Windows users are fortunate to have access to numerous screen and audio recorder windows options, ranging from built-in solutions to powerful third-party applications that can handle even the most demanding recording scenarios.
While many users know that Windows includes basic recording capabilities, few realize the full potential of these tools or understand how to optimize them for professional-quality output. This comprehensive guide will walk you through every available method for screen recording on Windows, from the simple built-in Game Bar to advanced third-party solutions. You’ll discover how to configure audio settings properly, master advanced recording techniques, troubleshoot common issues, and implement best practices that ensure your recordings look and sound professional every time.
Understanding Windows Screen Recording Fundamentals
Screen recording on Windows has evolved significantly, offering multiple approaches to capture both visual content and audio simultaneously. Whether you’re creating tutorials, documenting software issues, or recording presentations, understanding the fundamental concepts will help you choose the right method for your specific needs.
Types of Screen Recording Available
Windows provides several distinct recording methods, each with unique capabilities and use cases. The built-in Xbox Game Bar offers quick access for basic recording tasks, making it an excellent starting point for casual users. This native screen and audio recorder windows solution captures both display content and system audio without requiring additional software installations.
Professional applications like OBS Studio and Camtasia provide advanced features including multi-source recording, real-time editing, and custom encoding settings. These tools excel when you need precise control over recording parameters or plan to create polished content for professional distribution.
Browser-based recording solutions have gained popularity for their convenience and cross-platform compatibility. These web applications typically handle basic recording tasks effectively, though they may have limitations regarding system access and audio capture capabilities compared to dedicated desktop software.
Audio Sources and Quality Considerations
Understanding audio capture is crucial for creating effective recordings. A windows screen recorder with audio typically handles two primary audio sources: system audio and microphone input. System audio includes sounds from applications, media playback, and system notifications, while microphone input captures your voice or external sounds.
The sound recorder windows functionality can simultaneously capture both audio streams, allowing you to create comprehensive recordings that include your narration alongside application sounds. However, achieving optimal audio quality requires attention to several factors. Microphone placement, background noise reduction, and proper input levels significantly impact the final recording quality.
When you screen record with sound windows, consider the audio format and bitrate settings. Higher bitrates produce better quality but result in larger file sizes. For most applications, 128-192 kbps provides an excellent balance between quality and file size. Additionally, ensure your microphone input levels avoid clipping while maintaining sufficient volume for clear speech.
Audio synchronization represents another critical consideration. Some recording methods may introduce slight delays between video and audio tracks, particularly when capturing from multiple sources simultaneously. Testing your setup before important recordings helps identify and resolve potential synchronization issues.
System Requirements and Limitations
Successful screen recording depends on adequate system resources and understanding inherent limitations. Modern recording requires sufficient CPU power to encode video streams in real-time, adequate RAM to buffer captured content, and available storage space for output files.
Most contemporary Windows systems can handle basic recording tasks, but high-resolution or high-framerate recording demands more substantial hardware resources. Recording at 1080p with 60fps typically requires a multi-core processor and at least 8GB of RAM for smooth operation without impacting system performance.
Storage considerations become particularly important for longer recordings. Uncompressed video files can consume several gigabytes per hour, making available disk space a limiting factor for extended recording sessions. Planning storage requirements and choosing appropriate compression settings helps manage file sizes effectively.
When you record audio from computer sources, Windows audio drivers and system configuration can introduce limitations. Some applications implement audio protection that prevents direct system audio capture, requiring alternative approaches or specialized software to bypass these restrictions.
Graphics hardware acceleration can significantly improve recording performance when available. Modern graphics cards often include dedicated encoding chips that reduce CPU load during recording, enabling higher quality captures with minimal system impact. However, older systems may lack these capabilities, requiring careful balance between recording quality and system performance.
Understanding these fundamentals provides the foundation for selecting appropriate recording methods and configuring optimal settings for your specific requirements and system capabilities.
Using Windows Built-in Recording Tools
Windows comes equipped with several native recording tools that eliminate the need for third-party software in many scenarios. These built-in options provide reliable functionality for basic screen and audio recorder windows needs, though each serves distinct purposes and has specific limitations worth understanding.
Xbox Game Bar for Screen Recording
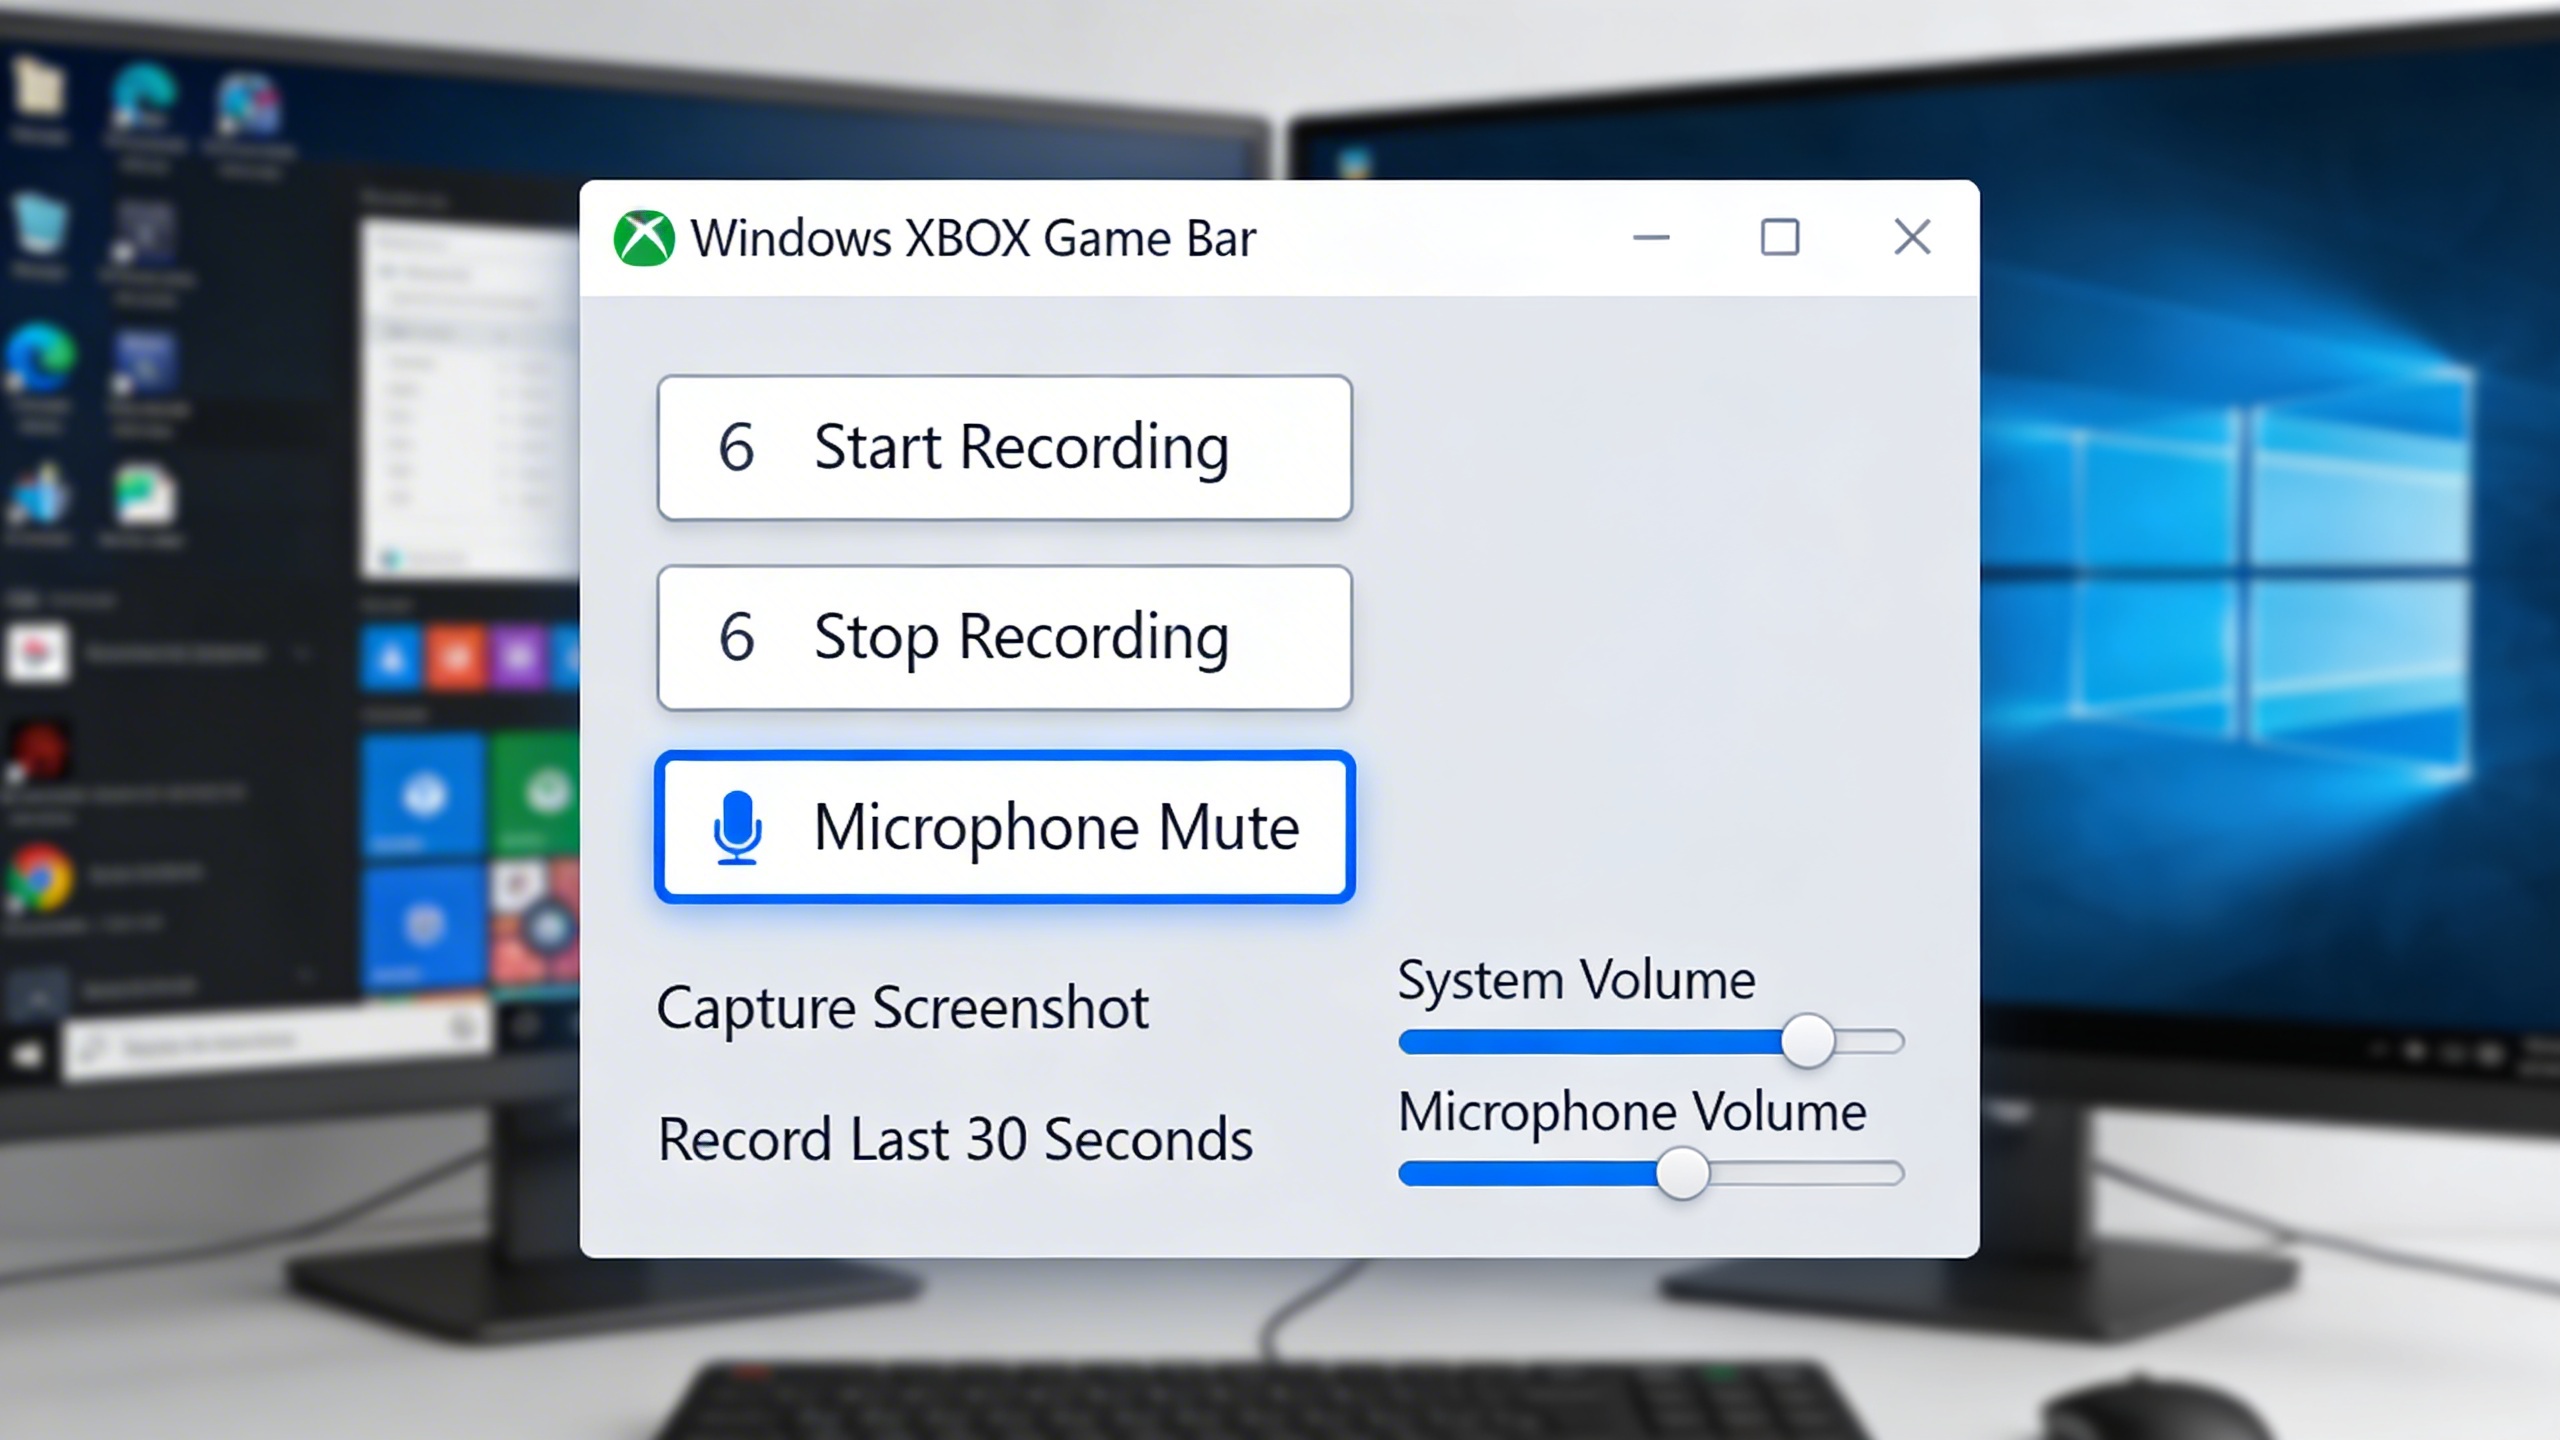
The Xbox Game Bar represents Microsoft’s most comprehensive built-in solution for screen recording with audio. Originally designed for gaming, this windows screen recorder with audio has evolved into a versatile tool for capturing any application or desktop activity.
To enable Xbox Game Bar, open Windows Settings and navigate to Gaming > Xbox Game Bar, then toggle the switch to “On.” The default keyboard shortcut Windows + G opens the overlay, but you can customize this in the settings. Once activated, the Game Bar appears as a translucent toolbar across your screen.
Recording begins by clicking the circular record button or pressing Windows + Alt + R. The Game Bar captures the currently active window by default, including system audio and microphone input if enabled. A small recording indicator appears in the corner, showing elapsed time and providing quick access to stop recording.
The tool offers several useful features including screenshot capture (Windows + Alt + PrtScn), audio mixing controls, and the ability to record the last 30 seconds of activity using the “Capture that” feature. Recordings save automatically to the Videos/Captures folder in MP4 format with decent compression and quality.
However, Xbox Game Bar cannot record the desktop itself or certain system applications like File Explorer. It focuses on individual application windows, making it ideal for software demonstrations, gameplay capture, and tutorial creation within specific programs.
Windows Voice Recorder for Audio Only
The Windows Voice Recorder app provides a straightforward solution when you need a dedicated sound recorder windows tool. This lightweight application excels at capturing voice notes, interviews, lectures, and any audio input through your microphone.
Launch Voice Recorder from the Start menu or by typing “voice recorder” in the search bar. The interface presents a large microphone button that begins recording immediately when clicked. During recording, the app displays a real-time waveform visualization and elapsed time counter.
The app automatically saves recordings with timestamps in the default Documents/Sound recordings folder. Files save in M4A format, which provides good quality compression while maintaining compatibility across devices. You can trim recordings directly within the app using the built-in editing tools, though options remain basic compared to dedicated audio editing software.
Voice Recorder supports background recording, allowing you to minimize the app and continue using your computer while capturing audio. The app also includes sharing options for email, OneDrive, and other connected services, making it convenient for quick audio distribution.
One significant limitation involves audio source selection – Voice Recorder only captures microphone input and cannot record system audio or computer playback. For comprehensive audio capture including music, videos, or application sounds, you’ll need alternative solutions.
PowerPoint Screen Recording Feature
Microsoft PowerPoint includes a hidden gem for users who need to screen record with sound windows functionality within presentation contexts. This feature allows you to capture screen activity and embed it directly into slides, creating interactive presentations and tutorials.
Access this feature through the Insert tab in PowerPoint, where you’ll find “Screen Recording” in the Media group. Clicking this option darkens your screen and provides a selection tool to choose your recording area. You can select a specific window, application, or draw a custom rectangle around any screen region.
The recording toolbar includes options for audio capture (both system and microphone), pointer highlighting, and click visualization. These features make PowerPoint particularly effective for creating instructional content where viewer engagement and clarity matter most.
PowerPoint’s screen recording automatically embeds into your current slide as a video object. You can resize, position, and apply standard video formatting options like borders, shadows, and effects. The embedded video plays directly within presentation mode, creating seamless integration between recorded content and slide materials.
This approach works exceptionally well for training presentations, software walkthroughs, and educational content where the recording serves as supporting material rather than standalone video. However, recordings remain tied to the PowerPoint file, making extraction for independent use somewhat cumbersome.
The quality and file size limitations of PowerPoint recordings make them suitable for short demonstrations rather than lengthy capture sessions. Additionally, the feature requires PowerPoint installation and may not suit users seeking standalone recording capabilities.
These built-in Windows tools provide solid foundations for basic recording needs, though users requiring advanced features, multiple audio sources, or professional-grade output quality may benefit from exploring dedicated recording software solutions.
Third-Party Screen Recording Software Options
While Windows built-in tools provide basic functionality, third-party software often delivers enhanced features for professional screen and audio recording needs. These solutions typically offer superior audio quality, advanced editing capabilities, and specialized recording modes that make them ideal for content creators, educators, and business professionals.
Free Screen Recording Solutions
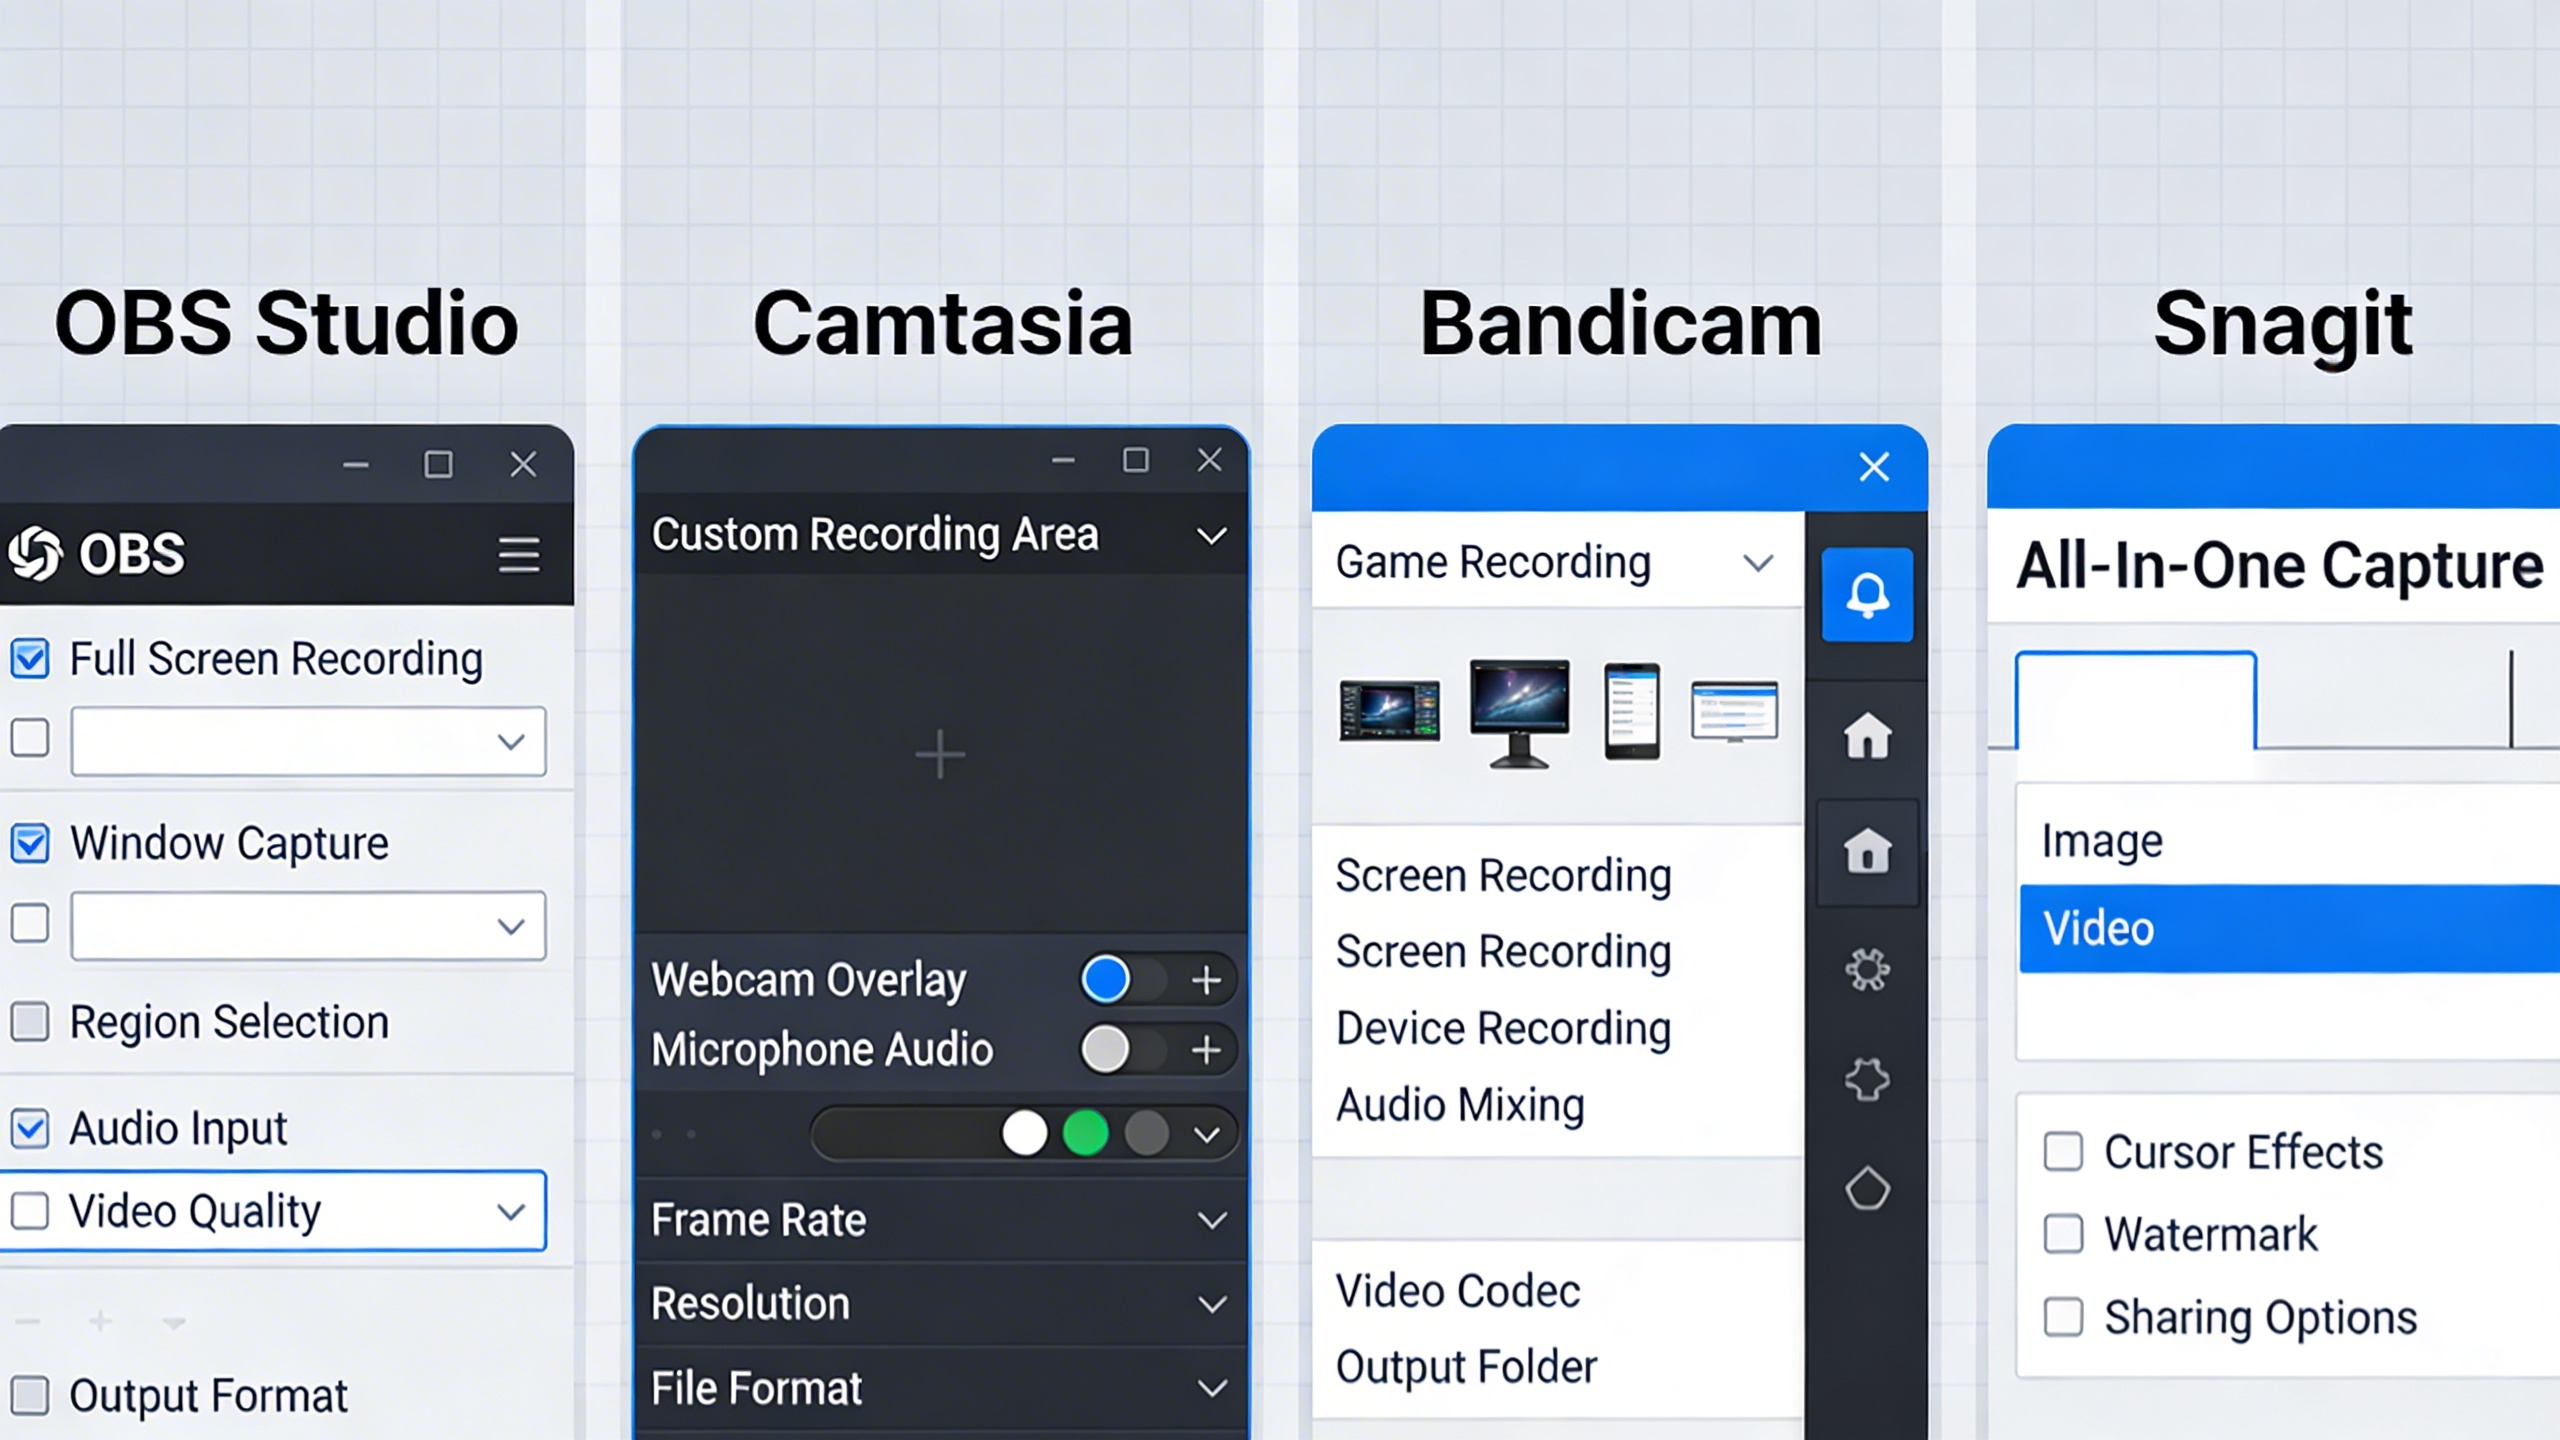
Several excellent free options provide comprehensive screen and audio recorder windows functionality without breaking the budget. OBS Studio stands out as the most powerful free solution, originally designed for live streaming but equally effective for local recording. This open-source platform supports multiple audio sources simultaneously, allowing you to capture system audio, microphone input, and specific application sounds with precise control.
ShareX offers another compelling free alternative with built-in screenshot and recording capabilities. Its lightweight design makes it perfect for quick recordings while still providing essential features like hotkey customization and automatic file organization. For users seeking simplicity, Flashback Express delivers professional-quality recordings with a user-friendly interface, though it includes a watermark on exported videos.
CamStudio, despite its dated interface, remains a reliable choice for basic screen recording tasks. It excels at creating compact file sizes while maintaining decent quality, making it suitable for educational content or simple demonstrations where file size matters more than advanced features.
Professional Recording Software
Professional solutions elevate your windows screen recorder with audio capabilities through advanced features and superior performance. Camtasia leads this category with its integrated editing suite, allowing you to record, edit, and produce polished videos within a single application. Its smart focus feature automatically highlights mouse clicks and keystrokes, while the built-in library of music and sound effects enhances your recordings.
Bandicam specializes in high-performance recording with minimal system impact, making it ideal for recording games or resource-intensive applications. Its hardware acceleration support ensures smooth recording even during demanding tasks, while the real-time drawing feature lets you annotate your screen during recording sessions.
Snagit focuses on quick, professional recordings with excellent editing tools. Its simplified workflow makes it perfect for creating training materials or documentation, while the smart text recognition feature allows you to extract text from recorded content for easy editing.
| Software | Best For | Key Strength | Audio Features |
|---|---|---|---|
| Camtasia | Educational content | Integrated editing | Multi-track audio editing |
| Bandicam | Gaming/Performance | Low system impact | High-quality audio capture |
| OBS Studio | Live streaming/Free solution | Unlimited customization | Advanced audio mixing |
| Snagit | Quick tutorials | Ease of use | Clear narration recording |
Browser-Based Recording Tools
Cloud-based recording solutions offer convenience and accessibility without requiring software installation. Loom has revolutionized browser-based recording by providing seamless screen record with sound windows functionality directly through your web browser. Its instant sharing capabilities make it perfect for remote collaboration and quick feedback sessions.
Screencastify integrates seamlessly with Google Chrome, offering educators and business users an efficient way to create instructional content. The automatic cloud storage ensures your recordings are accessible from any device, while the built-in editing tools handle basic trimming and annotation tasks.
Apowersoft Online Screen Recorder provides a comprehensive browser-based solution without watermarks or time limits. Its sound recorder windows functionality captures both system audio and microphone input with impressive clarity, making it suitable for professional presentations and tutorials.
For users requiring advanced transcription capabilities alongside their recordings, specialized tools can automatically convert spoken content to text. This feature proves invaluable for creating accessible content or generating meeting notes from recorded sessions.
When selecting third-party recording software, consider your specific workflow requirements, output quality needs, and budget constraints. Free solutions work well for occasional use, while professional software justifies its cost through time-saving features and superior output quality. Browser-based tools excel in collaborative environments where quick sharing and cloud storage provide significant advantages over traditional desktop applications.
Setting Up Audio Recording for Screen Capture
Proper audio configuration transforms basic screen recordings into professional presentations. Whether you’re creating tutorials, capturing gameplay, or recording video calls, mastering audio setup ensures your Windows screen recorder with audio delivers crystal-clear results that engage your audience.
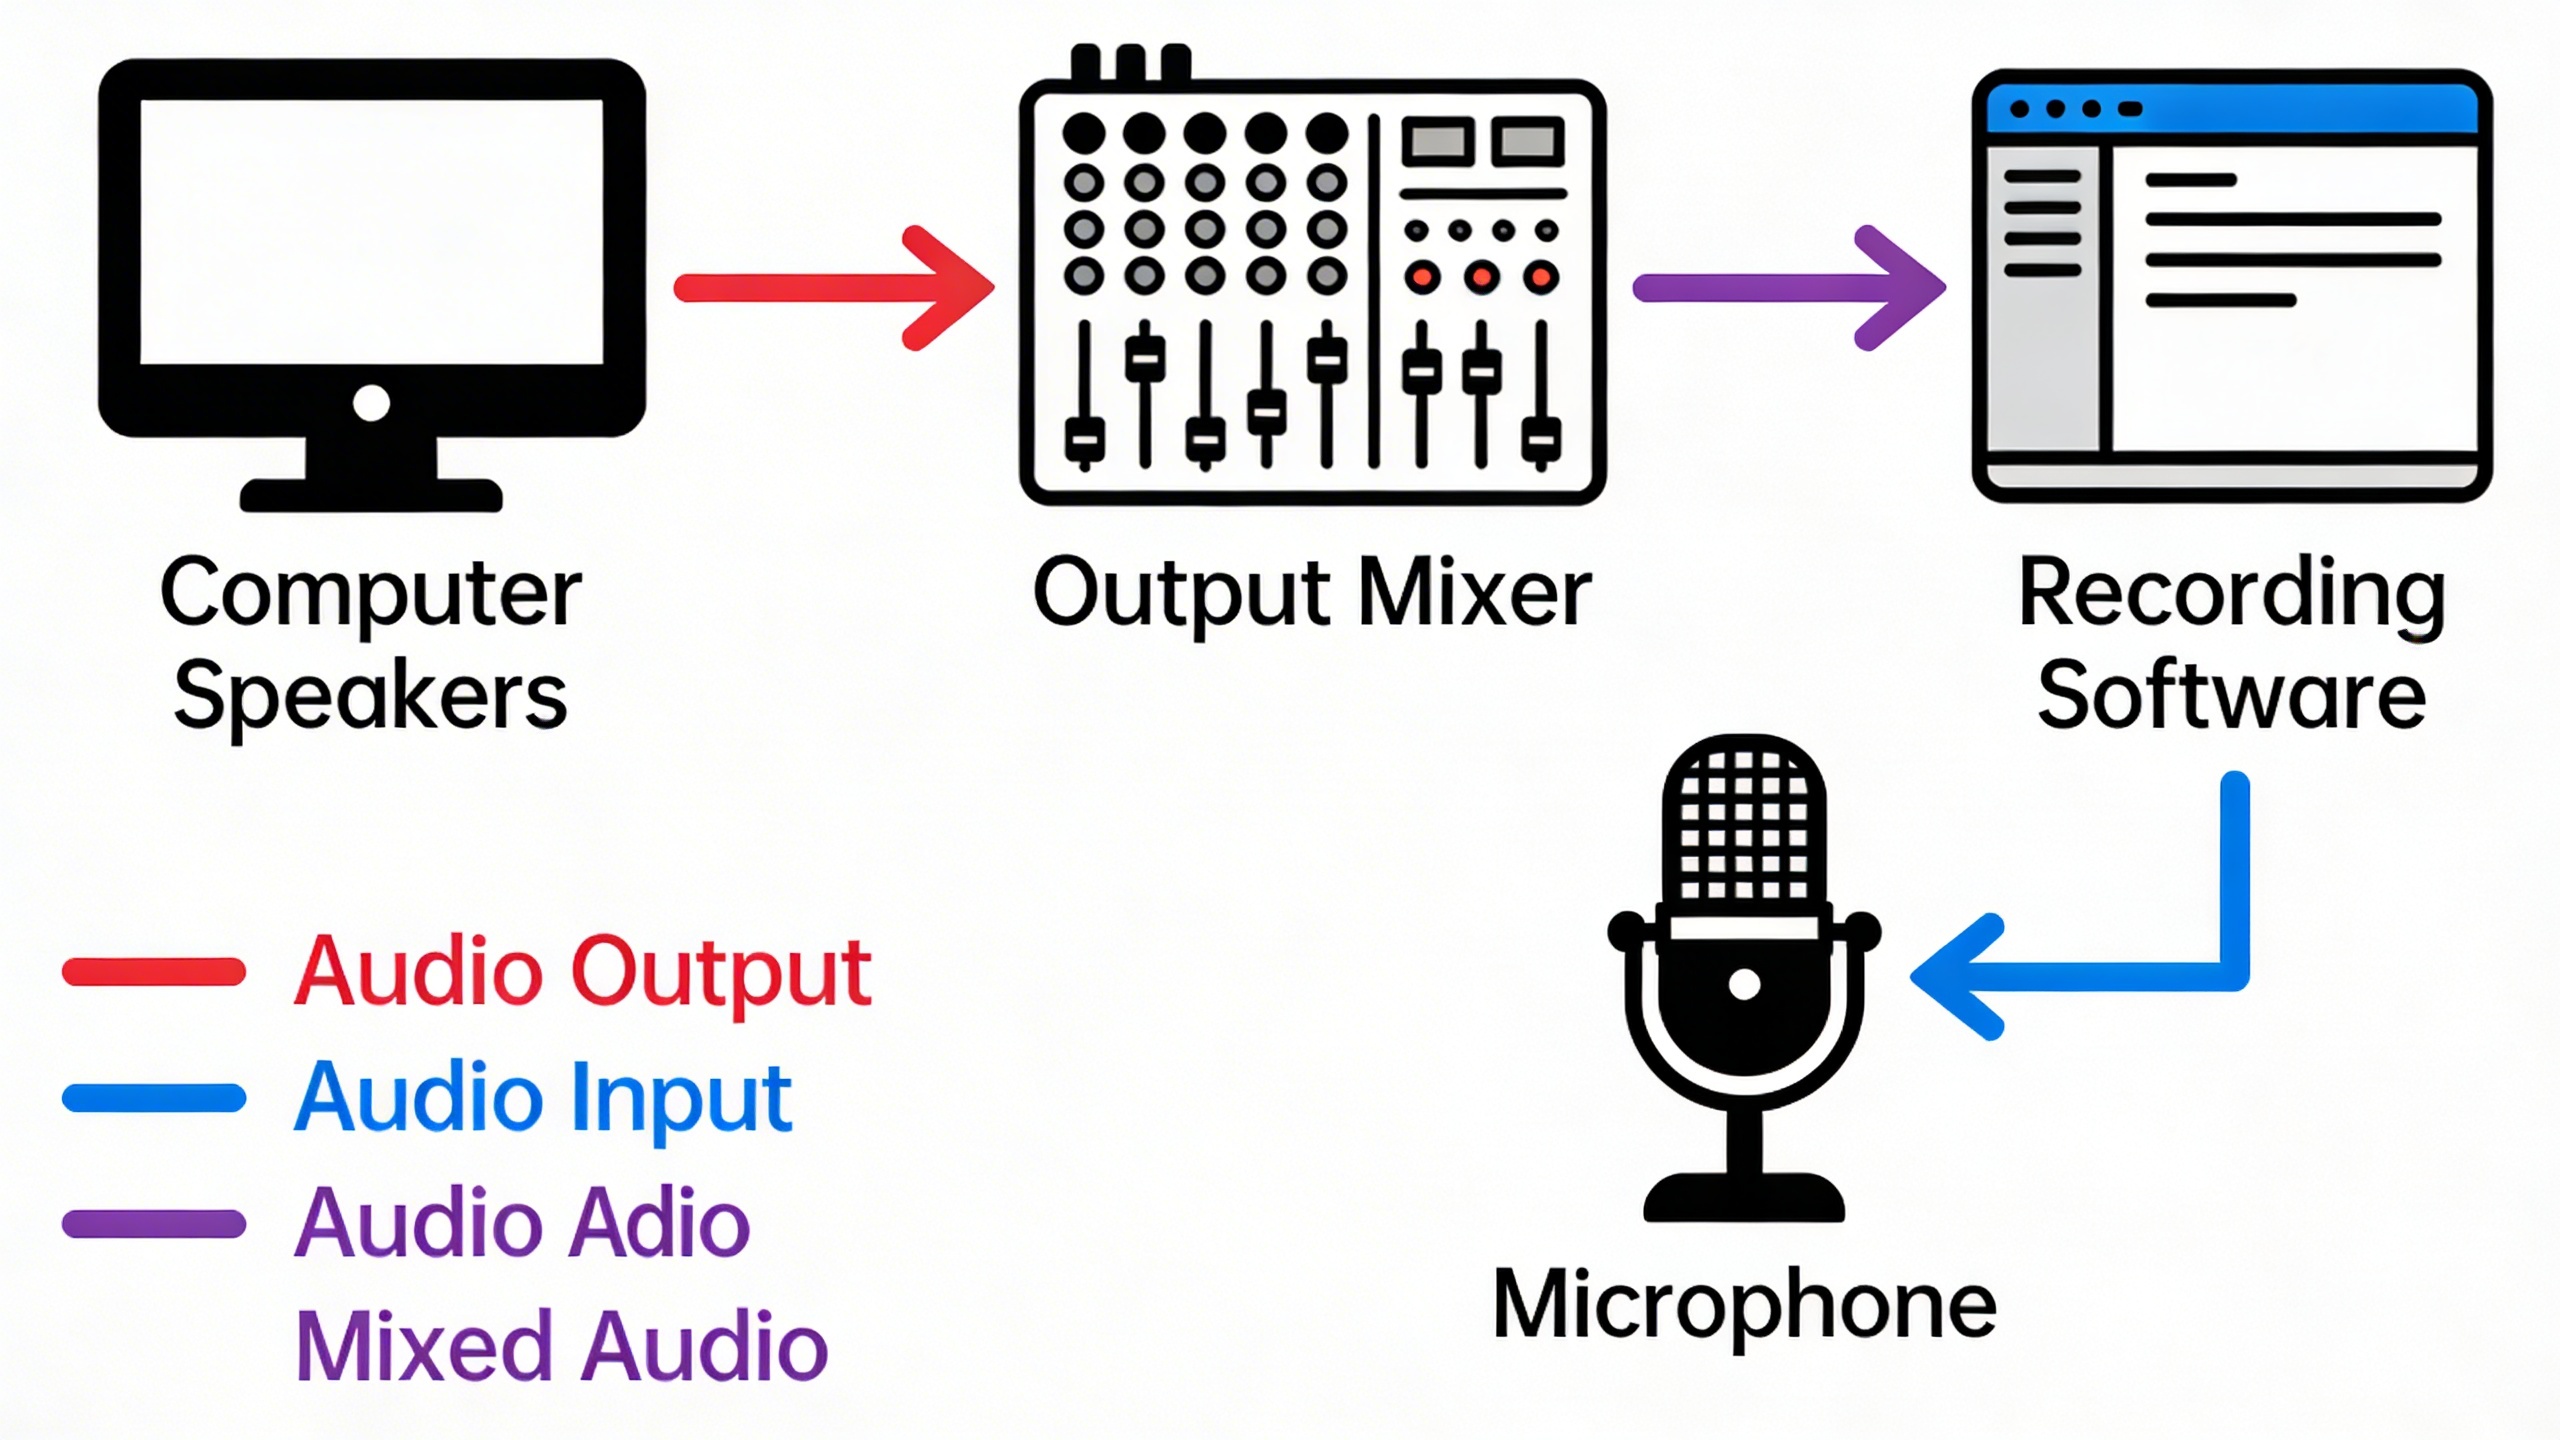
Configuring System Audio Capture
System audio capture requires careful attention to your Windows sound settings. Navigate to Settings > System > Sound and verify your default playback device matches the audio source you want to record. When using any screen and audio recorder windows application, ensure the “Stereo Mix” option is enabled in your recording devices list.
Access the Sound Control Panel by right-clicking the volume icon and selecting “Open Sound settings,” then “Sound Control Panel.” Under the Recording tab, right-click in an empty area and check “Show Disabled Devices” and “Show Disconnected Devices.” If Stereo Mix appears, right-click it and select “Enable.” This allows your sound recorder windows software to capture all system audio, including music, game sounds, and notification alerts.
For optimal results, set your system volume to approximately 70-80% before recording. This provides sufficient audio levels while preventing distortion that can occur at maximum volume settings.
Adding Microphone Commentary
Professional commentary requires proper microphone setup and positioning. Place your microphone 6-8 inches from your mouth at a slight angle to avoid breathing directly into it. USB microphones typically offer superior quality compared to built-in laptop microphones for screen record with sound windows projects.
Configure your microphone through Windows Sound settings by selecting it as your default recording device. Access its properties to adjust levels and enable noise suppression features. Set the microphone level to capture your voice clearly without background noise interference. Test recording levels by speaking normally while monitoring the green bars in the sound meter.
Consider using a pop filter or windscreen to eliminate plosive sounds (hard “p” and “b” sounds) that can create audio spikes in your recordings. Position yourself in a quiet environment with minimal echo to ensure your commentary remains crisp and professional.
Balancing Multiple Audio Sources
Managing both system audio and microphone input simultaneously requires precise level balancing. Your commentary should remain audible above background system sounds without overwhelming the content you’re demonstrating.
Start by setting system audio at a lower level than your microphone input. A general rule involves keeping system audio at 30-40% while maintaining microphone levels at 60-70%. This ensures viewers can clearly hear your explanations while still perceiving important system sounds and alerts.
Most recording software provides real-time audio monitoring through visual meters. Watch these indicators during recording to ensure neither audio source clips or distorts. If you notice audio levels consistently hitting the red zone, reduce the input gain for that specific source.
To record audio from computer sources effectively while maintaining commentary clarity, consider using audio ducking features available in advanced recording software. This automatically reduces system audio levels when you speak, then restores them during silence.
Test your audio balance before important recordings by creating short samples. Play back these tests using headphones to identify any issues with volume levels, echo, or feedback that might not be apparent during live recording sessions.
Advanced Recording Techniques and Settings
Mastering advanced recording techniques transforms basic screen captures into professional-quality content. These optimization strategies ensure your recordings deliver maximum impact while maintaining manageable file sizes and efficient workflows.
Optimizing Video Quality and File Size
Finding the perfect balance between quality and file size requires understanding how resolution and frame rate affect your recordings. For most educational content, 1080p resolution at 30 fps provides excellent clarity without creating unnecessarily large files. However, when demonstrating fast-paced software interactions or gaming content, increasing to 60 fps ensures smooth motion capture.
Your choice of codec significantly impacts both quality and file size. H.264 offers broad compatibility and reasonable compression, making it ideal for sharing recordings across different platforms. For archival purposes or when maximum quality is essential, consider H.265 (HEVC), which provides superior compression while maintaining visual fidelity.
When using any screen and audio recorder windows application, monitor your system resources during recording. CPU-intensive encoding can cause dropped frames or audio sync issues. If you notice performance problems, reduce the frame rate to 24 fps or lower the resolution to 720p until your system handles the workload smoothly.
Recording Specific Applications vs Full Screen
Application-specific recording offers distinct advantages over full-screen capture, particularly for professional presentations and tutorials. Most windows screen recorder with audio tools allow you to select individual windows, eliminating desktop clutter and focusing viewer attention on relevant content.
When recording specific applications, ensure the target window remains active and unobstructed throughout the session. Some recording software automatically follows window movements and resizing, while others require manual adjustment. Test this behavior before important recordings to avoid capturing blank areas or missing content.
For software demonstrations requiring multiple applications, consider using virtual desktops to organize your workspace. This approach allows seamless transitions between programs while maintaining clean, professional-looking recordings without desktop distractions.
Scheduling and Automated Recording
Automated recording workflows save time and ensure consistency across multiple sessions. Many advanced recording tools support scheduled recordings, perfect for capturing webinars, online meetings, or regular training sessions without manual intervention.
When setting up automated recordings, configure your sound recorder windows settings to handle various audio scenarios. Establish consistent input levels and test different microphone positions to ensure reliable audio capture. For meetings or presentations where you need both system audio and voice notes, tools like Sozai can complement your recording setup by providing accurate transcription of spoken content alongside your video captures.
Create recording profiles for different scenarios to streamline your workflow. Develop separate configurations for software tutorials, presentation recordings, and gaming sessions, each with appropriate resolution, frame rate, and audio settings. This preparation allows you to screen record with sound windows efficiently without adjusting settings for each session.
Consider implementing post-recording automation as well. Many tools can automatically save files to specific folders, apply basic editing like trimming silence, or even upload completed recordings to cloud storage. When you record audio from computer sources regularly, these automated workflows become invaluable for maintaining organized archives and consistent output quality.
Troubleshooting Common Recording Issues
Even the most reliable screen and audio recorder windows setups can encounter technical challenges. Understanding how to diagnose and resolve these issues ensures your recording sessions remain productive and your content maintains professional quality.
Fixing Audio Sync Problems
Audio synchronization issues plague many recording sessions, particularly when using a windows screen recorder with audio that handles multiple input sources. The most common cause stems from buffer delays between video capture and audio processing.
Start by checking your audio buffer settings in your recording software. Reduce buffer sizes to 256 or 512 samples for real-time recording scenarios. If you’re experiencing persistent sync drift, record audio and video to separate tracks when possible, then align them during post-production using visual cues like hand claps or screen taps.
For system audio capture, ensure your sound recorder windows settings match your system’s sample rate. Mismatched sample rates between 44.1kHz and 48kHz frequently cause gradual audio drift. Access Windows Sound settings, select your playback device, and verify all sources use identical sample rates.
Resolving Performance and Lag Issues
Recording lag typically results from insufficient system resources or suboptimal encoding settings. When you screen record with sound windows, your computer simultaneously processes video encoding, audio capture, and system operations.
Close unnecessary applications before recording sessions, particularly resource-intensive programs like web browsers with multiple tabs or background streaming services. Monitor your CPU usage through Task Manager during test recordings to identify performance bottlenecks.
Adjust your recording resolution and frame rate based on your content needs. Recording at 1080p 30fps instead of 4K 60fps significantly reduces processing demands while maintaining quality for most applications. Consider using hardware encoding (NVENC for NVIDIA or Quick Sync for Intel) to offload processing from your CPU to dedicated graphics hardware.
Handling Storage and File Management
Large recording files can quickly overwhelm your storage capacity and cause system instability. When you record audio from computer sources alongside video, file sizes increase substantially due to uncompressed audio streams.
Implement a systematic file organization strategy before beginning extensive recording projects. Create dedicated folders with clear naming conventions that include dates and project identifiers. Set up automatic file cleanup routines to remove temporary files and failed recordings.
Monitor your available disk space continuously during long recording sessions. Most recording software will abruptly stop when storage runs low, potentially corrupting your entire session. Configure low-disk-space warnings and consider recording directly to external drives with ample capacity.
Establish regular backup procedures for important recordings. Cloud storage solutions provide excellent redundancy, but local backup drives offer faster access for large video files. Schedule automated backups during off-peak hours to maintain system performance during active recording periods.
Best Practices for Professional Screen Recording
Creating professional-quality recordings requires more than just pressing the record button. Following established best practices ensures your screen and audio recorder windows sessions produce polished results that effectively communicate your message to viewers.
Planning Your Recording Session
Preparation forms the foundation of successful screen recording. Before launching your windows screen recorder with audio, close unnecessary applications to minimize system resource usage and eliminate potential distractions. Clear your desktop of sensitive files and organize your workspace to maintain a clean, professional appearance throughout the recording.
Create a detailed outline or script covering the key points you plan to demonstrate. This preparation prevents rambling and ensures your recording stays focused and concise. Test your audio setup by speaking at normal volume levels while monitoring input levels in your sound recorder windows application. Background noise can significantly impact recording quality, so consider using a quiet room or investing in noise-canceling equipment.
Verify that your screen resolution matches your intended output format. Recording at higher resolutions than necessary creates unnecessarily large files, while recording at lower resolutions may result in poor visual quality when viewed on larger displays.
Post-Recording Editing and Enhancement
Raw recordings rarely represent the final product. Basic editing transforms good recordings into professional presentations. Start by trimming unnecessary content from the beginning and end of your recording. Remove long pauses, mistakes, and irrelevant sections to maintain viewer engagement.
Audio enhancement plays a crucial role in professional recordings. When you screen record with sound windows, background noise and inconsistent volume levels often require correction. Apply noise reduction filters to eliminate ambient sounds and normalize audio levels to ensure consistent volume throughout the recording.
Add visual elements that enhance comprehension. Highlight cursor movements, include callout boxes for important information, and incorporate smooth transitions between different sections. Many editing applications offer templates specifically designed for screen recordings that can accelerate your workflow.
Consider adding captions or subtitles to improve accessibility. This practice benefits viewers in noisy environments and ensures your content reaches a broader audience, including those with hearing impairments.
Sharing and Distribution Options
File size directly impacts sharing efficiency and viewer experience. Compress your recordings using appropriate codecs that balance quality with file size. H.264 compression typically provides excellent results for most screen recordings, offering broad compatibility across devices and platforms.
When you record audio from computer sources alongside screen content, ensure your export settings maintain audio quality while optimizing file size. Consider creating multiple versions: a high-quality version for archival purposes and compressed versions optimized for different distribution channels.
Choose distribution platforms based on your audience and content sensitivity. Cloud storage services offer convenient sharing for internal team communications, while video platforms provide broader reach for educational or marketing content. For sensitive recordings containing proprietary information, consider password-protected sharing options or enterprise-grade platforms with enhanced security features.
Implement consistent naming conventions and metadata tags to organize your recording library effectively. This practice becomes invaluable when managing multiple recordings or collaborating with team members who need to locate specific content quickly.