
Whether you’re creating software tutorials, documenting bugs for your development team, or recording important video calls, knowing how to record screen and audio on Mac is an essential skill for today’s digital professionals. Mac users often struggle with capturing both visual content and system audio simultaneously, as Apple’s built-in tools have certain limitations that aren’t immediately obvious. The ability to screen record with audio on mac opens up countless possibilities for content creators, educators, remote workers, and IT professionals who need to create comprehensive documentation or training materials.
This complete guide walks you through every aspect of professional screen capture on macOS, from understanding the fundamentals to mastering advanced recording techniques. You’ll discover how to use Apple’s native QuickTime Player and Screenshot toolbar, learn workarounds to capture screen and audio mac users need for system sound recording, and explore powerful third-party solutions that offer enhanced features. We’ll also cover optimization strategies for recording quality, performance troubleshooting, and professional workflows that ensure your screen recordings meet broadcast standards.
By the end of this guide, you’ll have the knowledge and tools to handle any screen recording scenario on your Mac, whether you need basic capture capabilities or advanced features for professional content creation.
Understanding Mac Screen Recording Fundamentals
Recording screen and audio on Mac has evolved significantly with macOS’s built-in capabilities, offering users multiple pathways to capture high-quality content. Whether you’re creating tutorials, documenting software workflows, or preserving important presentations, understanding the fundamental components of Mac screen recording ensures optimal results for your specific needs.
Built-in vs Third-Party Recording Solutions
macOS provides several native options to record screen with audio on mac, each designed for different use cases. The QuickTime Player offers straightforward screen recording with system audio capture, while Screenshot Toolbar (Command + Shift + 5) provides quick access to both screenshot and screen recording functions. These built-in tools excel at basic recording tasks and integrate seamlessly with the operating system’s security protocols.
Third-party applications extend beyond native capabilities, offering advanced features like multi-track audio recording, real-time editing, and enhanced compression options. Professional content creators often prefer dedicated software for its granular control over recording parameters, custom hotkeys, and specialized output formats. The choice between built-in and third-party solutions depends on your recording complexity, frequency of use, and desired output quality.
Native macOS solutions handle most standard recording scenarios effectively, while third-party options become essential for complex multi-source recordings or professional broadcast requirements. Consider your workflow demands when selecting between these approaches.
Audio Recording Permissions and System Requirements
Successfully implementing macos record screen with audio requires proper system permissions configuration. macOS treats audio recording as a sensitive operation, requiring explicit user authorization through System Preferences. Navigate to Security & Privacy, then Privacy tab, and ensure your chosen recording application has microphone access enabled.
For internal system audio capture, additional steps may be necessary depending on your macOS version. Some applications require installing audio drivers or virtual audio devices to capture system sounds alongside microphone input. Screen capture with audio mac functionality often depends on these permission settings being correctly configured before recording begins.
Hardware requirements vary based on recording scope and quality settings. Modern Mac computers with Apple Silicon or Intel processors from 2018 onwards typically handle standard screen recording without performance issues. However, recording high-resolution displays at maximum quality while running resource-intensive applications may require additional RAM and processing power. Monitor your system’s performance during test recordings to establish optimal settings for your hardware configuration.
File Formats and Quality Considerations
Output format selection significantly impacts file size, compatibility, and post-production flexibility when you capture screen and audio mac content. macOS natively supports MOV format recording, which provides excellent quality but generates larger file sizes. This format works seamlessly within Apple’s ecosystem and maintains high fidelity for professional editing workflows.
MP4 format offers broader compatibility across platforms and devices while maintaining reasonable file sizes through efficient compression. For web distribution or sharing across different operating systems, MP4 typically provides the best balance between quality and accessibility. Consider your intended audience and distribution channels when selecting output formats.
| Format | File Size | Compatibility | Quality | Best Use Case |
|---|---|---|---|---|
| MOV | Large | Apple ecosystem | Highest | Professional editing |
| MP4 | Medium | Universal | High | Web sharing |
| M4V | Medium | Apple devices | High | iTunes integration |
Quality settings directly influence recording performance and storage requirements. Higher resolution recordings consume more system resources and generate larger files, while lower settings may compromise visual clarity for detailed software demonstrations. Frame rate selection affects motion smoothness, with 30fps suitable for most applications and 60fps reserved for gaming or high-motion content.
Audio quality settings require similar consideration, balancing file size against clarity requirements. For voice narration, moderate compression settings typically suffice, while music or complex audio scenarios benefit from higher bitrate configurations.
Using macOS Built-in Screen Recording Tools
macOS provides robust native tools for screen recording that eliminate the need for third-party applications in most scenarios. These built-in solutions offer professional-grade functionality while maintaining seamless integration with your Mac’s ecosystem. Understanding these tools empowers you to record screen and audio mac content efficiently without additional software installations.
Screenshot Toolbar Method
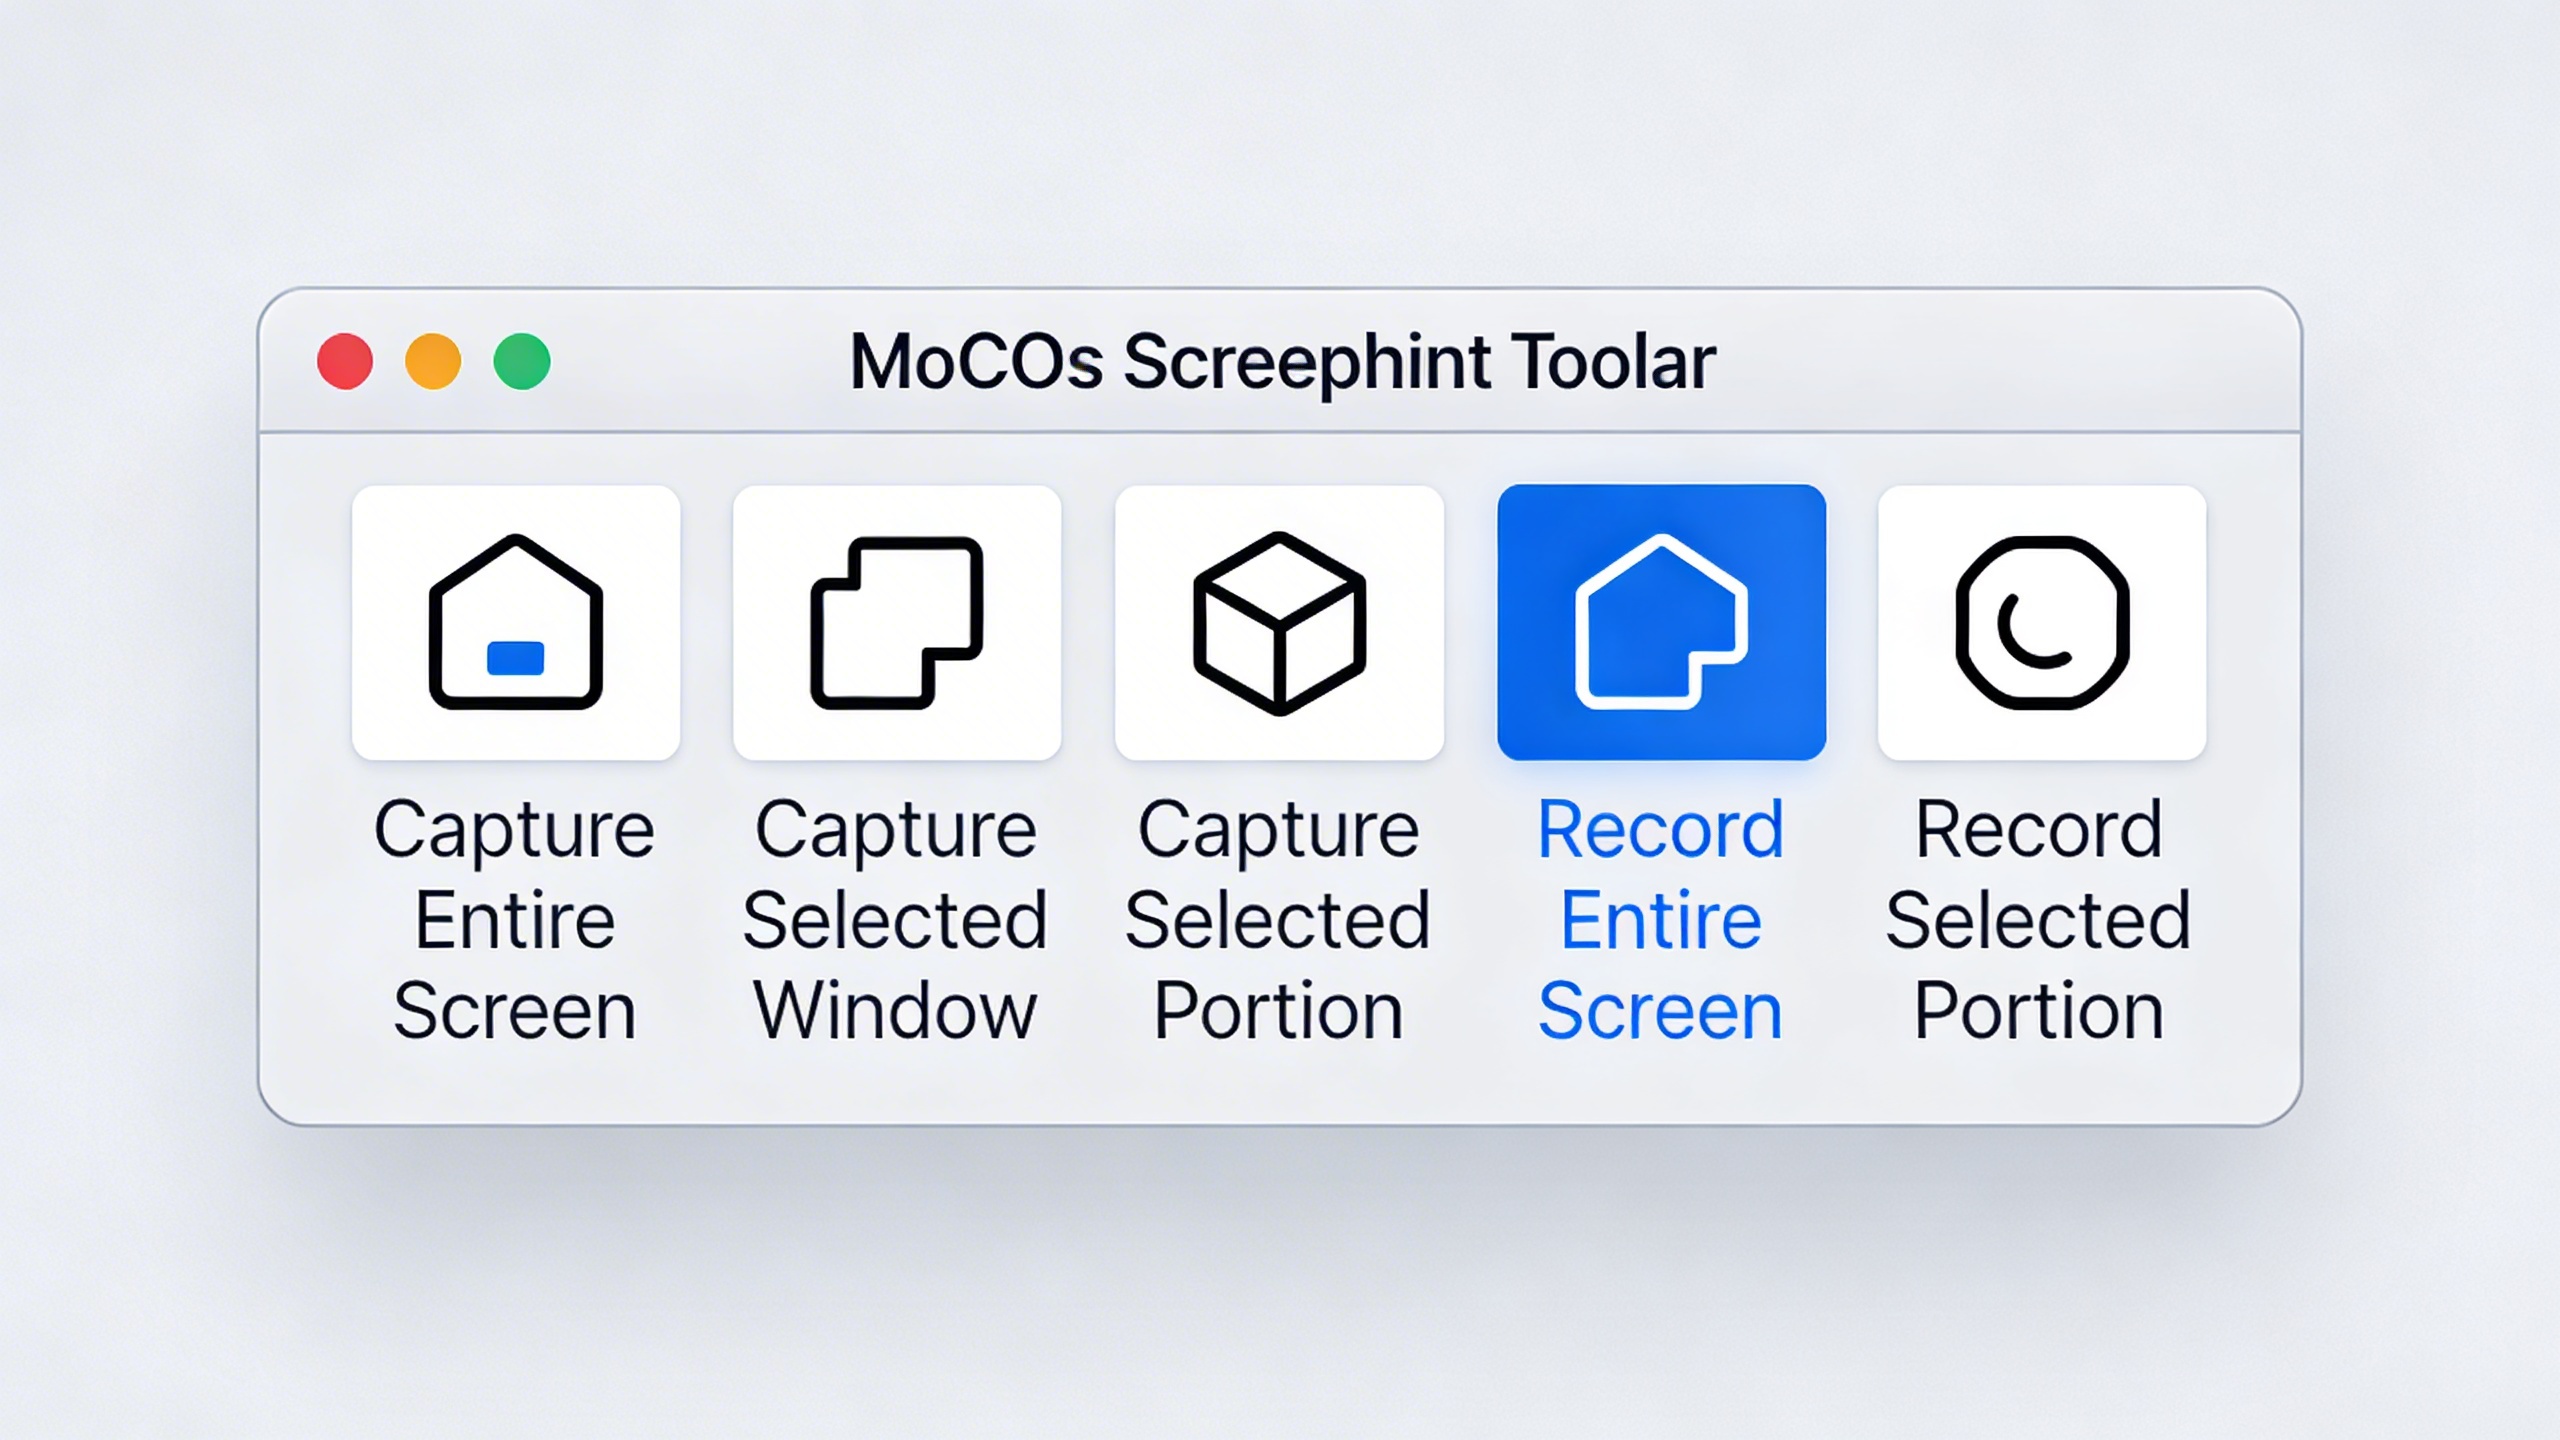
The Screenshot toolbar represents the most intuitive approach to screen recording on modern Mac systems. This comprehensive interface consolidates all recording options into a single, accessible panel.
To access the Screenshot toolbar, press Cmd + Shift + 5 simultaneously. This action opens a floating toolbar at the bottom of your screen, displaying various capture options including three screen recording modes: record entire screen, record selected window, and record selected portion.
Before initiating your recording, click the “Options” button to configure essential settings. Here you can specify the save location, set a countdown timer, and crucially, configure audio input sources. To screen record with audio on mac, select your preferred microphone from the audio dropdown menu. For system audio capture, you’ll need to enable additional settings or use alternative methods, as the Screenshot toolbar primarily captures microphone input by default.
Select your desired recording area by clicking the appropriate icon. For full-screen recording, choose the leftmost recording option. To capture a specific window, select the middle option and click on your target window. For custom areas, use the rightmost option and drag to define your recording region.
Once configured, click “Record” or press the spacebar to begin. The toolbar disappears, and recording commences after any configured countdown period. A small recording indicator appears in your menu bar, providing quick access to stop the recording when finished.
QuickTime Player Screen Recording
QuickTime Player offers an alternative method to macos record screen with audio, particularly useful for users who prefer working within a dedicated application interface. This approach provides additional control over recording settings and file management.
Launch QuickTime Player from your Applications folder or via Spotlight search. Navigate to “File” in the menu bar and select “New Screen Recording.” This action opens a recording window with a prominent red record button and an adjacent dropdown arrow for accessing advanced options.
Click the dropdown arrow beside the record button to configure your audio input source. QuickTime allows you to select from available microphones connected to your Mac. While QuickTime doesn’t natively capture internal system audio, you can screen capture with audio mac by combining it with audio routing applications like Soundflower or BlackHole for comprehensive audio recording.
The recording interface offers two primary modes: click anywhere to record the entire screen, or drag to select a specific portion. QuickTime displays helpful instructions on-screen to guide your selection process. The selected area becomes highlighted with a subtle border, confirming your recording region.
During recording, QuickTime provides a stop button in the menu bar. Click this button or use the keyboard shortcut Cmd + Control + Esc to end your recording session. QuickTime automatically opens the recorded file for immediate preview and basic editing capabilities.
Keyboard Shortcuts and Controls
Mastering keyboard shortcuts significantly streamlines the screen recording process, enabling rapid access to recording functions without interrupting your workflow. These shortcuts work system-wide, regardless of your currently active application.
The primary shortcut **Cmd + Shift + 5** opens the Screenshot toolbar instantly. This universal command provides access to all native recording options. For users who frequently capture screen and audio mac content, memorizing this shortcut proves invaluable for maintaining productivity.
During active recording sessions, several control options remain available. Press **Cmd + Control + Esc** to stop any ongoing screen recording immediately. This shortcut works regardless of which method initiated the recording, providing consistent control across different recording tools.
The **Option** key modifies recording behavior when held during area selection. While dragging to define a recording region, holding Option centers the selection around your initial click point rather than treating it as a corner anchor. This technique proves particularly useful when capturing symmetrical interface elements or centered content areas.
For enhanced workflow efficiency, familiarize yourself with the **Spacebar** function within the Screenshot toolbar. After configuring your recording settings and selecting your capture area, pressing Spacebar immediately begins recording without requiring mouse interaction with the record button.
These native macOS tools provide robust functionality for most screen recording scenarios. While they excel at capturing visual content and microphone audio, users requiring simultaneous system audio recording may need to explore additional solutions or third-party applications to achieve comprehensive audio capture alongside their screen recordings.
Recording Screen with System Audio on Mac
Recording screen and audio mac sessions becomes significantly more complex when you need to capture system audio alongside your screen content. Unlike Windows systems, macOS doesn’t natively support internal audio recording for security reasons, requiring specialized configurations and third-party solutions to achieve professional-quality results.
Enabling Internal Audio Capture
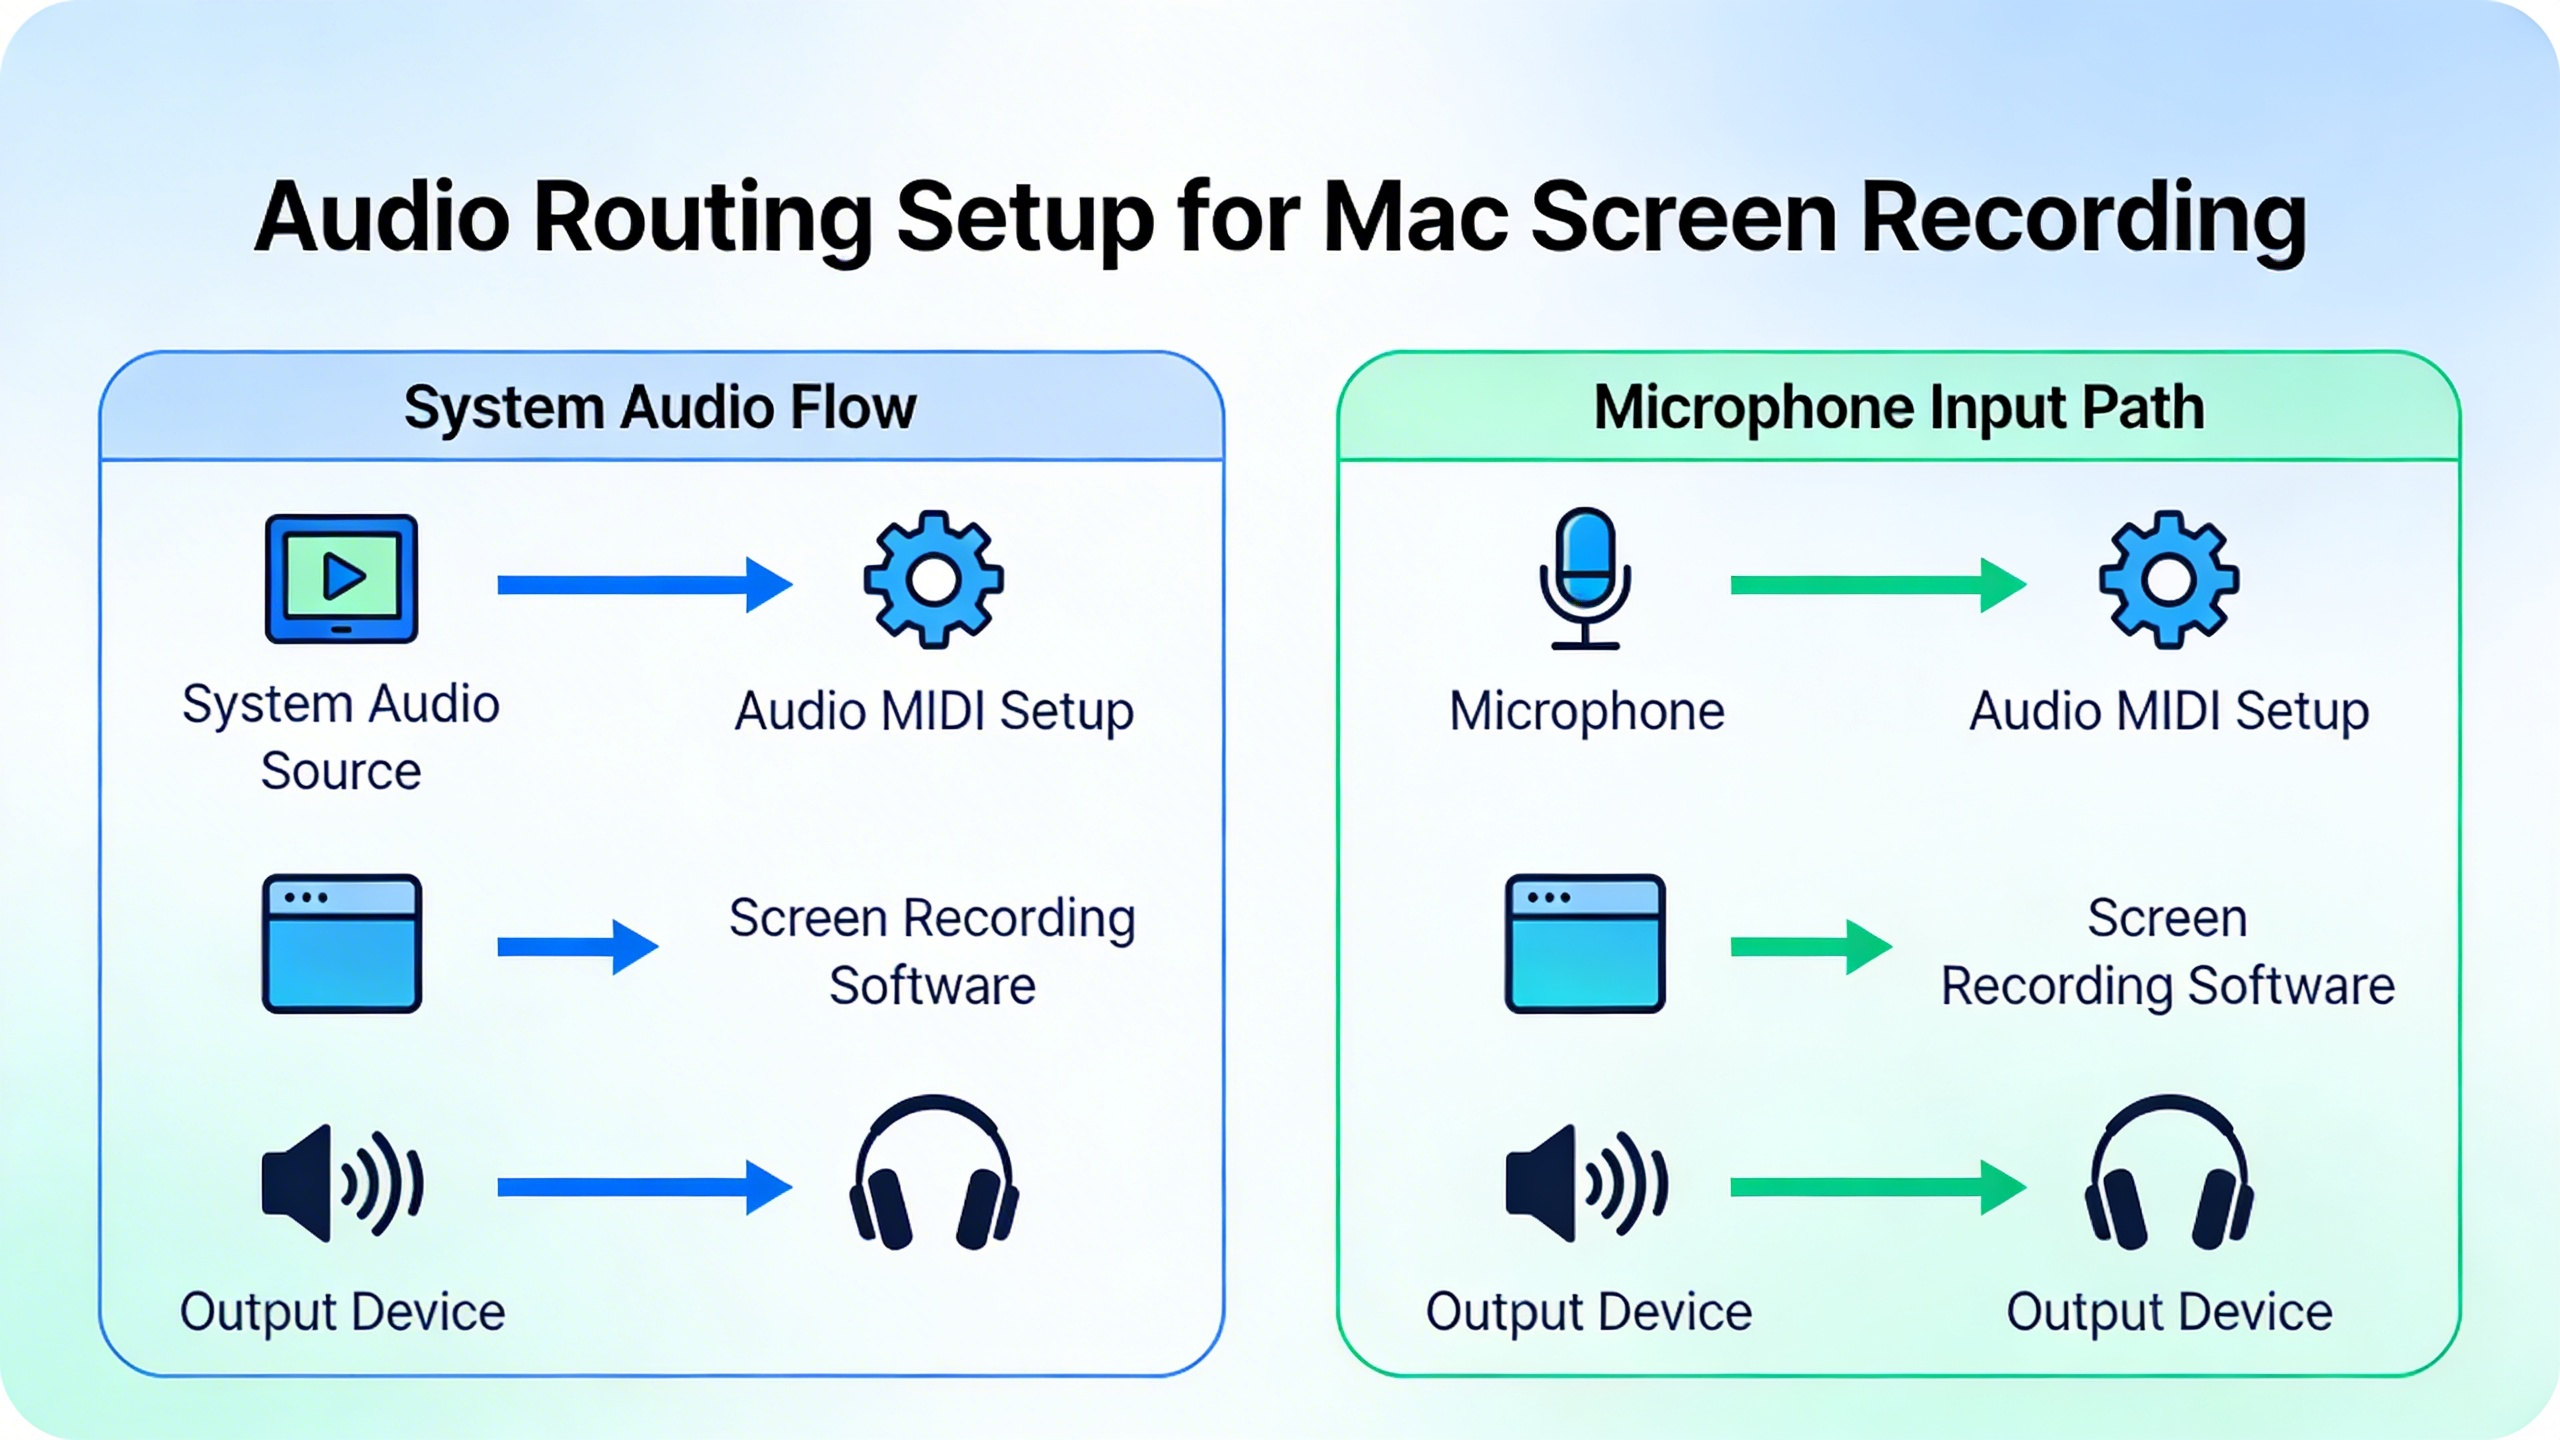
The primary challenge when you want to screen record with audio on mac is that macOS blocks direct access to system audio output. This security feature prevents applications from secretly recording your audio, but it also complicates legitimate screen recording needs. To overcome this limitation, you’ll need to create a virtual audio routing system that redirects your Mac’s audio output to become an available input source.
The most straightforward approach involves using macOS’s aggregate device feature combined with third-party audio drivers. Navigate to Applications > Utilities > Audio MIDI Setup to access your Mac’s audio configuration panel. Here, you can create custom audio devices that combine multiple inputs and outputs, though this method requires additional software to capture system audio effectively.
When configuring internal audio capture, ensure your sample rate matches across all audio devices. A mismatch between your system audio output (typically 44.1 kHz or 48 kHz) and your recording input can result in audio drift, where the audio gradually falls out of sync with your video content during longer recordings.
Using Soundflower and Audio Routing
Soundflower remains one of the most reliable solutions for macos record screen with audio workflows, despite being a legacy application. This virtual audio driver creates additional audio devices that can route your Mac’s system audio to recording applications. After installing Soundflower, you’ll find new audio devices in your Sound preferences: Soundflower (2ch) and Soundflower (64ch).
To implement Soundflower for screen capture with audio mac recording, set Soundflower (2ch) as your system’s audio output device. This routes all system audio through Soundflower instead of your speakers or headphones. Then, configure your recording application to use Soundflower (2ch) as its audio input source. This setup allows you to capture any audio playing through your Mac, including music, video soundtracks, and application audio.
However, using Soundflower alone creates a significant drawback: you won’t hear the audio during recording since it’s being routed to the virtual device instead of your speakers. To solve this, create an aggregate device in Audio MIDI Setup that combines Soundflower with your preferred audio output device. This configuration allows simultaneous audio routing to both your recording application and your speakers.
Modern alternatives to Soundflower include BlackHole and Loopback, which offer improved compatibility with recent macOS versions and additional features like per-application audio routing. BlackHole provides similar functionality to Soundflower but with better performance and active development support.
Managing Multiple Audio Sources
Professional screen recording often requires combining multiple audio sources: system audio, microphone input, and sometimes additional external sources. To capture screen and audio mac content with multiple sources, you’ll need to create a more sophisticated audio routing setup using aggregate devices or dedicated audio mixing software.
Create a multi-input aggregate device by opening Audio MIDI Setup and clicking the plus button to add a new aggregate device. Select all the audio sources you want to combine: your virtual audio driver (like BlackHole), your microphone, and any other input devices. This creates a single input device that your recording software can access, containing all your audio sources on separate channels.
When working with multiple audio sources, pay careful attention to gain levels and potential feedback loops. If your microphone is too sensitive, it might pick up system audio playing through your speakers, creating echo or feedback. Use headphones during recording to prevent this issue, or configure your audio routing to exclude microphone monitoring from the speaker output.
For applications requiring real-time audio mixing and processing, consider professional audio software like Logic Pro X or dedicated audio routing applications. These tools provide precise control over audio levels, effects processing, and routing configurations that can enhance your screen recording’s audio quality significantly.
Remember that complex audio routing setups can impact system performance, particularly on older Mac models. Test your configuration thoroughly before important recordings to ensure stable audio capture without dropouts or synchronization issues.
Advanced Screen Recording Techniques
Mastering selective recording methods allows you to capture exactly what you need while maintaining professional quality. These advanced techniques help you record screen and audio mac workflows more efficiently, whether you’re creating tutorials, documenting software processes, or capturing specific application behaviors.
Partial Screen and Window Recording
Recording only specific portions of your screen reduces file sizes and focuses viewer attention on relevant content. When you press Command + Shift + 5, select “Record Selected Portion” to define a custom recording area. This technique proves invaluable when demonstrating software features without revealing sensitive information in other windows.
For window-specific recording, hold the spacebar after selecting the partial recording tool. Your cursor transforms into a camera icon, allowing you to click on any window to record just that application. This method automatically adjusts if the window moves or resizes during recording, maintaining consistent framing throughout your macos record screen with audio session.
Professional tip: When recording partial screens, leave some padding around your target area. This prevents important interface elements from getting cut off if windows shift slightly during recording.
Multi-Monitor Setup Recording
Managing multiple displays during screen recording requires strategic planning to capture the right content across different monitors. macOS allows you to record each display independently or combine multiple screens into a single recording session.
To screen record with audio on mac across multiple monitors, access the recording options and select which display to capture. Each monitor appears as a separate recording option in the control panel. For presentations spanning multiple screens, consider recording each monitor separately and combining the footage in post-production for better control over the final output.
| Recording Scenario | Best Approach | Considerations |
|---|---|---|
| Primary workflow on main display | Single monitor recording | Smaller file size, focused content |
| Reference materials on secondary screen | Dual monitor recording | Larger file size, comprehensive view |
| Switching between displays frequently | Individual recordings per monitor | Flexible editing options |
Recording Specific Applications
Application-specific recording isolates individual programs while filtering out desktop distractions. This approach works particularly well for software demonstrations where you want to screen capture with audio mac applications without revealing other running programs or desktop files.
Launch the target application and use Command + Shift + 5 to access recording options. Select “Record Selected Window” and click on your chosen application. The recording automatically follows that application, even if you switch between different windows within the same program.
For enhanced visual clarity, enable cursor highlighting in the recording options. This feature adds a colored circle around your mouse pointer, making it easier for viewers to follow your actions. Click highlighting provides additional visual feedback by showing a brief animation whenever you click, which proves especially useful for tutorial content.
When recording applications that generate their own audio output, ensure your capture screen and audio mac settings include system audio. Some applications may require specific audio routing configurations to properly capture both interface sounds and any media playback within the program.
Consider using Sozai for capturing audio narration alongside your screen recordings, as it provides high-quality voice transcription that can be converted into captions or documentation to accompany your recorded content.
Professional Third-Party Recording Software
While macOS built-in tools handle basic recording needs, professional workflows often require advanced features that only specialized third-party software can deliver. These applications offer enhanced control over audio routing, sophisticated editing capabilities, and seamless integration with professional content creation pipelines.
Feature Comparison of Popular Apps
Professional screen recording applications distinguish themselves through comprehensive feature sets designed for demanding use cases. When you need to record screen and audio mac sessions with precision control, these tools provide granular settings for frame rates, codecs, and audio sources that surpass native capabilities.
| Software | Audio Sources | Export Formats | Live Streaming | Price Range |
|---|---|---|---|---|
| ScreenFlow | System + Microphone | MP4, MOV, M4V | No | $169 |
| Camtasia | Multiple simultaneous | MP4, MOV, GIF | No | $299 |
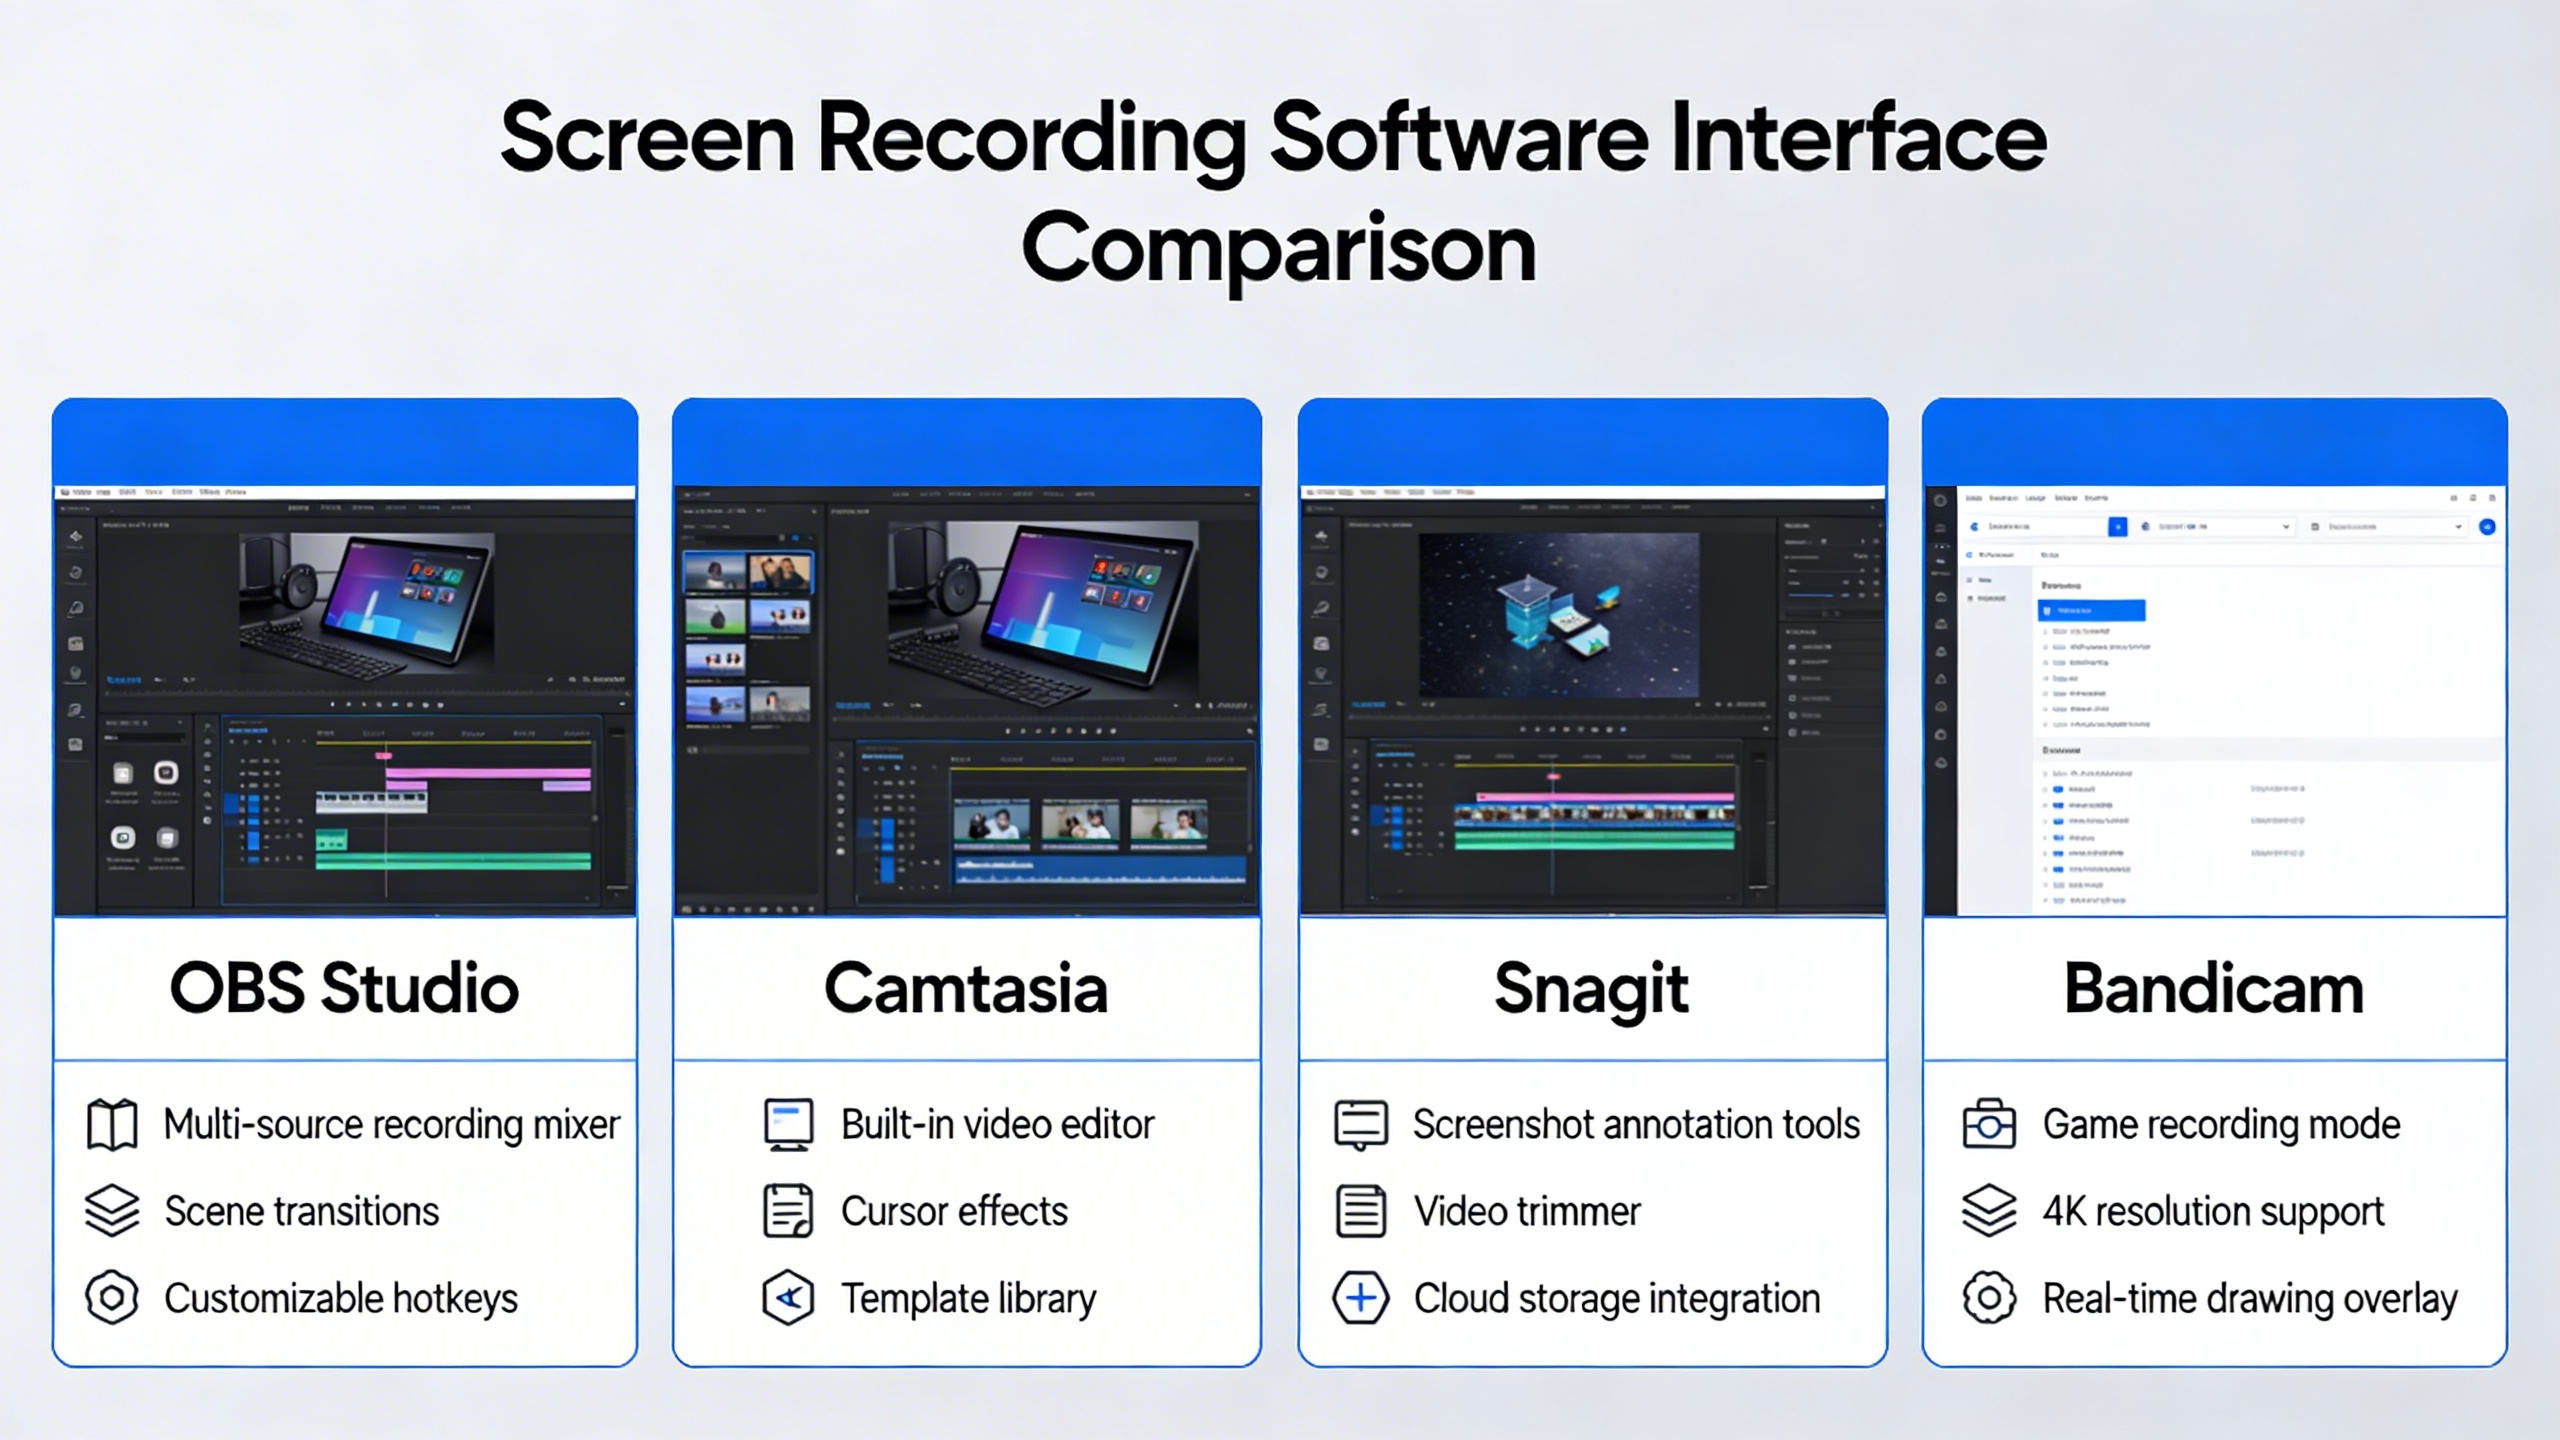
| OBS Studio | Unlimited sources | FLV, MP4, MOV | Yes | Free |
| CleanMyMac X | System audio only | MP4 | No | $89 |
ScreenFlow excels at post-production editing with timeline-based workflows, making it ideal for tutorial creation and educational content. Its ability to macos record screen with audio while maintaining separate audio tracks simplifies the editing process significantly. Camtasia offers similar capabilities with additional callout tools and animations, though at a higher price point.
OBS Studio stands out as a free, open-source solution that rivals expensive alternatives in functionality. Its modular approach allows users to screen record with audio on mac while simultaneously streaming to multiple platforms, making it invaluable for content creators who need versatile output options.
Enterprise-Grade Recording Solutions
Enterprise environments require recording solutions that address security, compliance, and scalability concerns. These professional-grade applications offer features like encrypted storage, audit trails, and centralized management that consumer tools cannot match.
Snagit provides enterprise licensing with deployment tools for IT administrators, while maintaining user-friendly interfaces for non-technical staff. Its ability to screen capture with audio mac sessions includes automatic cloud synchronization and team sharing capabilities that streamline collaborative workflows.
Loom represents the modern approach to enterprise recording, combining local capture capabilities with cloud-based processing and sharing. Teams can capture screen and audio mac content directly to secure cloud storage, with automatic transcription services that make recordings searchable and accessible.
For organizations handling sensitive information, solutions like TechSmith Relay offer on-premises deployment options with granular permission controls and integration with existing authentication systems.
Integration with Workflow Tools
Modern recording software extends beyond simple capture to become integral components of professional workflows. The most effective solutions integrate seamlessly with project management platforms, cloud storage services, and communication tools that teams already use.
Direct integration with platforms like Slack, Microsoft Teams, and Google Workspace eliminates friction in sharing recorded content. Advanced applications can automatically upload recordings to designated folders, notify team members of new content, and even generate automated summaries of recorded sessions.
API connectivity enables custom workflow automation through tools like Zapier or direct integration with internal systems. This capability allows organizations to trigger recordings based on calendar events, automatically process captured content, and distribute materials according to predefined rules.
For professionals who frequently need to document meetings or create instructional content, tools like Sozai complement screen recording workflows by providing accurate transcription services for captured audio content, creating searchable text records alongside video files.
The investment in professional recording software pays dividends through time savings, improved content quality, and enhanced collaboration capabilities. When evaluating options, consider not just the upfront cost but the long-term value of features like automated workflows, team collaboration tools, and integration possibilities that align with your specific professional requirements.
Optimizing Recording Quality and Performance
When you record screen and audio on Mac, balancing quality with system performance becomes crucial for maintaining smooth workflows. The settings you choose directly impact file sizes, processing demands, and overall recording experience. Understanding these trade-offs helps you achieve professional results without compromising your Mac’s performance.
Resolution and Frame Rate Settings
Your resolution and frame rate choices fundamentally determine both quality and file size when you screen record with audio on Mac. For most professional applications, recording at your display’s native resolution provides the clearest output, but this isn’t always necessary or practical.
Consider these resolution guidelines based on your intended use:
| Use Case | Recommended Resolution | Frame Rate |
|---|---|---|
| Software tutorials | 1920×1080 or native | 30 fps |
| Gaming content | Native resolution | 60 fps |
| Quick demonstrations | 1280×720 | 24-30 fps |
| Presentations | 1920×1080 | 24 fps |
Frame rates above 30 fps rarely provide noticeable benefits for typical screen recordings, but they significantly increase file sizes and processing requirements. When you macos record screen with audio for instructional content, 24-30 fps delivers smooth playback while keeping files manageable.
Storage and Processing Considerations
Screen recordings generate substantial file sizes that grow exponentially with higher quality settings. A 10-minute recording at 1080p with audio typically produces files between 500MB to 2GB, depending on content complexity and compression settings.
Plan your storage strategy before starting lengthy recordings. Dedicated external drives offer several advantages for screen capture projects: they prevent your system drive from filling up, provide faster write speeds for high-quality recordings, and simplify file organization. SSD storage delivers optimal performance when you capture screen and audio mac content regularly.
Processing demands vary significantly based on your recording method. Hardware-accelerated encoding, available in professional recording software, reduces CPU load by leveraging your Mac’s graphics processing unit. This approach maintains system responsiveness during recording while producing high-quality output files.
Battery Life and Resource Management
Screen recording with audio places considerable demands on your Mac’s resources, particularly affecting battery life on portable models. CPU usage typically increases by 20-40% during active recording, while additional strain comes from disk writing and audio processing.
Implement these battery conservation strategies for extended recording sessions:
- Close unnecessary applications and browser tabs before recording
- Reduce screen brightness to minimum acceptable levels
- Disable background processes like automatic backups and syncing
- Use lower frame rates for content that doesn’t require smooth motion
- Consider recording in segments rather than single long sessions
For professionals who frequently screen capture with audio mac content, investing in adequate cooling solutions prevents thermal throttling during intensive recording sessions. External monitors can also reduce the processing load on integrated graphics systems, improving overall performance and battery efficiency.
Monitor your system’s resource usage through Activity Monitor during test recordings to identify optimal settings for your specific workflow requirements.
Troubleshooting Common Recording Issues
Even experienced users encounter challenges when attempting to record screen and audio mac sessions. Understanding how to diagnose and resolve these issues ensures consistent, professional results for your screen capture projects.
Audio Sync and Quality Problems
Audio synchronization issues represent the most frequent complaint when users screen record with audio on mac systems. When audio drifts out of sync with video, first check your system’s sample rate settings in Audio MIDI Setup. Ensure both input and output devices operate at the same sample rate, typically 44.1 kHz or 48 kHz.
Poor audio quality often stems from incorrect microphone levels or background noise interference. Access System Preferences > Sound > Input to adjust microphone sensitivity. For optimal results when you macos record screen with audio, position your microphone 6-8 inches from your mouth and eliminate ambient noise sources like air conditioning or computer fans.
If you notice audio dropouts during longer recordings, insufficient system resources may be the culprit. Close unnecessary applications and ensure adequate free disk space before initiating screen capture with audio mac sessions. Monitor Activity Monitor during recording to identify resource-intensive processes that might interfere with audio processing.
Permission and Security Settings
macOS security features can prevent successful screen recording if permissions aren’t properly configured. Navigate to System Preferences > Security & Privacy > Privacy tab to review screen recording permissions. Applications must appear in this list with checkboxes enabled to capture screen and audio mac content effectively.
For third-party recording software, you may need to grant additional permissions for microphone access, accessibility features, and full disk access. After installing new recording applications, restart your Mac to ensure all permission changes take effect properly.
System Integrity Protection (SIP) occasionally interferes with advanced recording features. While disabling SIP isn’t recommended for security reasons, you can temporarily disable it through Recovery Mode if absolutely necessary for professional recording workflows. Always re-enable SIP after completing your recording tasks.
File Corruption and Recovery
Recording file corruption typically occurs when sessions end unexpectedly due to system crashes or forced application termination. Most modern recording applications create temporary files during capture, which can sometimes be recovered even after unexpected shutdowns.
Check your application’s temporary file directory, usually located in ~/Library/Application Support/[App Name]/Temp. Many corrupted video files can be repaired using built-in recovery tools or third-party applications like VLC Media Player’s repair function.
Prevent future corruption by ensuring adequate storage space before recording, using reliable external drives for lengthy sessions, and enabling automatic backup features when available. Regular system maintenance, including disk utility repairs and clearing cache files, also reduces corruption risks during intensive screen recording operations.